Adsense

Sunday, November 28, 2010

Making Homemade Vanilla Extract and Vanilla Sugar!

 I am so excited making Vanilla extract and Vanilla sugar! KT and Na found the recipe from The Little Teochew and I have anticipate the day that I get all the ingredients, bottle and try them out! My mum always nag when I add in too much artificial Vanilla extract into my dessert. Therefore by creating my own Vanilla Extract I no longer have to rely on artificial Vanilla Extract!


How to make Vanilla sugar
- Just mix the sugar and Vanilla pods

How to make Vanilla extract
-Mix Vodka (35% alcohol) with Vanilla pods (seeds remove). If seeds were not remove will create a mild Vanilla extract. The longer you keep the Vanilla extract the better it will be!

When using the vanilla seeds, just take out from the vanilla sugar. Wash and dry the pods. Split it and remove the seeds. The Vanilla pods can be recycled and dump into the vanilla extract!

 Day 1 of using Vodka + 2 split Vanilla Pods. At first I didnt scrap out the seeds and have to dig them out and split them.
 Day 1 of Vanilla Extract and Vanilla Sugar
Day 5 of Vanilla Extract. Look how the colour has change!

Related post:
How to split the Vanilla pods and remove the seeds?

To cook or not to cook whip cream?

When making certain ice cream like vanilla and chocolate ice cream that require egg custard base, they often need to be cook with the milk. I find that by cooking the whip cream (as oppose to putting the whip cream in at the end), the texture of the ice cream is creamier and thicker! So going forward I will always cook the whip cream whenever the required to cook the custard!

How to split Vanilla pods and scrap out the seeds


Originally this video is about making Blueberry Ice cream. At the front part he show how to split the vanilla pods and getting the seeds out which i find it very useful!

How to make apple crumble recipe


Full Apple Crumble Recipe Video

I wanted to make the crumbs from the Apple crumble recipe and serve the apple raw with cream. The crumbs is intended for Apple crumble ice cream. I found the recipe at this website with detailed steps by steps. They even include a video for better understanding! I also took the mushroom soup recipe from this website. So far the website has been a pretty reliable source of recipes and tips. As I will be modifiying the steps since i am only making the crumbs. Feel free to visit the original site for the full Apple crumble recipe instruction.

I am only making the crumbs of the Apple crumble recipe and I will be using half of the quantity. Thus the amount, flour and apples have been modified or deleted.

Ingredients        
85 grams Granulated sugar     
85 grams Butter or cooking margarine
140 grams Superfine flour

OPTIONAL INGREDIENTS
1/2 cup rolled oats or Corn Flakes (most breakfast cereals will do)

COOKING EQUIPMENT
1 Medium-sized oven-proof dish
Weighing Scales
Fork

Method
Turn your oven on now so that it's pre-heated ready to cook later on! Heat settings are 180C / 350F / Gas Mark 5.
 
Now, make the 'crumble' mixture. I've tried this with my hands, an electric blender and a fork. I think a fork is best but the experts prefer hands!

Mix the butter / margarine with the flour in a dry bowl using a fork until you have a texture like breadcrumbs. It's not important that every single bit is like breadcrumbs, but try and get most of it like that. This will take about three minutes. If you are adding the optional ingredients of oatmeal or Corn Flakes, do it now. Mix it all in well.

Add 56.67g (not all the 85g) ounces of sugar to the mixture and mix it all together with the fork. This will tend to make the mixture even more like breadcrumbs. That's your crumble mixture made and ready.

Spread the crumble on a baking tray and spread out the remaining sugar. Put this into the middle of your pre-heated oven at 180°C / 350°F / Gas Mark 5 for 20 minutes.
Before baking.

Serve hot or cold with ice cream, cream or custard.

Vanilla Rasberry Crunchie Ice Cream Recipe


I tried making half of the quantity in the recipe. The taste and smell awesome. But the texture is a little on the rich side. Next time I will use my original Vanilla ice cream with the same combo of rasberry and crunchie bar combination (either with or without egg base).

The steps sounds a bit complicating to a newbie but if you break it into 3 main parts then its easier. 1) Make the Vanilla ice cream 2) Crush the Rasberry  3) Chop the crunchie bar. Mix all together when the vanilla ice cream is ready in ice cream maker.

Vanilla Raspberry Crunchie Ice Cream
250g raspberries (1)
2 tablespoon icing sugar
6 large 3gg yolks
75g caster sugar
568g milk
284ml cream (2)
1-2 Vanilla pods split (3)
2 x 40g crunchie bar roughly chop

Notes
1) Video they uses fresh raspberries but i uses frozen ones which is cheaper than fresh raspberries
2) Video uses heavy cream but i replace with whip cream. I don't think there is a difference in the cream since we do not need to beat the cream.
3) How to split Vanilla pods. This video shows how to make Vanilla blackberry ice cream. In the front part it shows how to split the vanilla pods and scrap out the seeds. I followed how he scrap them out. I wanted to save the vanilla pods to make vanilla extract. So i only uses the seeds in this recipe. When you see black spot on the ice cream - thats the vanilla seeds. If you do not have vanilla pods then can replace with vanilla extract.

Steps
1. Place 150g raspberries in a sieve. Press them through with the back of a spoon. Discarding the seeds. Sweeten with icing sugar and add more to taste if necessary.
2. Heat the milk, cream, vanilla pods until nearly boiling point.
3. Place egg yolks and sugar in a bowl. Mix to combine. Pour the milk mixture into egg while stirring continuously.
4. Sieve the custard and discard vanilla pods (if uses the pods. Otherwise can skip this step) into the pot. Medium heat. Warm gently while stirring continuously for about 10 minutes until thicken and coat the back of the spoon. Strain custard (means sieve) into a clean bowl and cover with bruise proof paper (or baking sheet) to prevent skim from forming. Let it cook.
5. Once cool put into freezer for 2 hours and into ice cream maker.
6. When ice cream almost done. Pour in the raspberries juice, raspberries fruit and chop crunchie bar.

Vanilla Ice cream recipe (cook custard base)

I took this recipe from my Phillip ice cream maker manual. It has egg base and it is creamy and delicious. I will be heating the egg and you will need to cool the mixture into room temperature in addition to putting it into fridge to chill. I will usually take my time and spend about a day for it to cool and chill. It takes time to make this recipe but the taste at the end is worth waiting for.

Vanilla ice cream is very versatile. You can mix and match with various types of ice cream. You can mix it with chocolate ice cream, top the ice cream with crush Oreo cookies, drizzle with caramel sauce, strawberry, chocolate and raspberry sauce. Or you can eat it with apple crumble. The combination is endless. Which is why I love making Vanilla ice cream to go with various other combination.

 I tried tweaking the recipe on my own. Initially I do not have Vanilla sugar so i replace with less than half a teaspoon of Vanilla essence. Once i bought the Vanilla pods, scrap out the seeds and then I heat the milk, cream and vanilla seeds together. The smell of using real vanilla is amazing and could not beat the artificially made Vanilla essence. I will write a separate post about the Vanilla pods and what I do with them. Another modification that I did is to heat the milk and cream together. Interestingly I find that the ice cream is thicker this way. Once I finish heating the egg mixture at the end and waiting for mixture to cool. I cover the surface with a baking sheet to prevent skim forming. Usually the egg will continue to cook and thus the texture becomes thicker.

Original recipe from the Philips ice cream maker instruction manual.
Ingredients
2 egg yolks
1 egg
125g caster sugar
5g vanilla sugar (or use less than half teaspoon of vanilla essence)
400ml whole milk
150ml whipping cream (no need beat)
5g corn flour

Instruction
Put egg yolks, caster sugar, vanilla sugar and corn flour into a bowl, Beat with the mixer until the egg yolks are almost white.

Gently heat the milk. Add the heated milk gradually to the egg mixture, while beating with the mixer. When the ingredients are thoroughly mixed, pour the mixture into a pan.

Heat the mixture over moderate heat for 1-2 minutes, while stirring constantly. Make sure the mixture does not boil. If the mixture curdles, mix the ingredients for half a minute with the mixer or in a blender or food processor.

*For me i just pour the mixture into the sieve to remove any small bits of curdling. Cover the surface with baking sheet.


After peeling off the baking sheet and before putting the mixture into the ice cream maker. The black spots are the vanilla seeds. The smell itself is amazing!


Let the mixture cool to refrigerator temperature. Then gently fold the cream through the mixture. Switch on the ice cream maker and pour the mixture into the cooling bowl.

Apple crumble Ice cream picture~!

 Have fun during hols making various types of ice cream~ Ate this at a cafe and inspired to make my own as I miss the apple crumble there.
Bottom layer has cream, raw apple slices and apple crumble. Top layer Vanilla ice cream whip cream, colourful sprinkle and hershey chocolate syrup.


Another classic is Chocolate and Vanilla Sundae Ice cream! The inside is layered with Chocolate and Vanilla ice cream. You can put all sort of condiments inside like any nuts, crush oreo cookies, chocolate + vanilla sprinkles. Some even put bits of pineapple. I drizzle the inside with hershey syrup. Top with whip cream and cherries. The whip cream can be replace with a layer of oreo cookies.

Related post:
How to make Vanilla Ice cream?
How to make Chocolate Ice cream?
How to make the crumble (original from apple crumble recipe)?

Rasberry Ripple Crunch ice cream picture

Making Rasberry Ripple Crunch Ice cream~! Basically its Vanilla Ice cream mix in with Rasberry sauce, Rasberry fruits and crush Cadbury Crunchie bar

How to make Rasberry Ripple Crunch Ice cream - video included

Friday, November 5, 2010

Green Tea ice cream picture and recipe

Green Tea ice cream~! 1 scoop of ice cream, top with whip cream and almond nibs. Decorate with biscuit. So adorable lah~

How to make Green Tea ice cream (Click here!)

Thursday, November 4, 2010

Improving my cheescake cooking method~

After reading some information and watch youtube about making a perfect cheesecake, I decided to change the method of cooking the cheese cake. The recipe is still the same. After reading some tips I decided to implement some of them and experiment the difference.

1. First I line my springform pan with aluminum foil. Next round I will try to line with baking sheet.
How to line the springform pan.
Tear a huge sheet of aluminum foil. Open your spring form pan. Put the sheet on top of the pan (the plate of the pan). Lock your springform pan. Now pull the side of the aluminum foil upwards (Make sure the sheet is big enough whereby it also cover the sides of the springform pan). I belief by lining it, the batter will not spill and also cause I will be soaking the whole pan into another big round pan filled with water. Due to soaking into another pot of water, I put a second layer of alluminium foil and cover outside of the pan just to make sure there is no leakage.

2. I press the crust down and make sure they stick firmly to the bottom of the pan. I still bake the crust as per normal.

3. Once the cheese cake mixture is ready. I pour boiled water into the bigger pan in the picture and put the smaller cheese cake pan into the bigger pan. This encourage even cooking in the cheese cake.


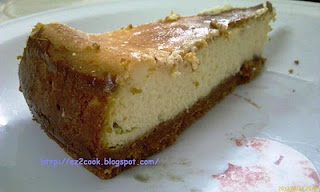
Left picture is the new method. Whereby the cake will stick to the side. I have already use a knife to loosen the side before unlocking the pan.
Right picture shows the old method. The cake will not stick to the side.


4. I notice a few difference when cooking it submerge in water from another pan.
- The cake does not rise. As you can see from the picture, the side and the center is the same height. The cake may look visually smaller as a result. The old method the cake will rise while cooking and deflate again when the oven has been switch off. As a result the cake's height is uneven from the side and center.
-New method wise the cake will stick to the side of the pan. Once it is cook I have to use a knife and detach the cake from the side of the pan. Else the cake may crack. I didn't notice this until the next day after taking out of the fridge. Luckily my cake didn't crack. The old method result in the cake shriveled away from the side and I do not have to use knife to detach it from the side of the pan.
- Check the side of the cake of both old method and new method. New method the side look beautiful while the old method side has been brown.

Cake side is beautiful. You can see the difference in color from the crust and the cheese. Height of the cake is even from the side to the center. Result in cake looking shorter.


Old method: Cake has been brown at the side and you cant see clearly the crust and the cheese color. Further the cake is uneven in height

New method
Overall the new method win in term of outlook and color. The cake height look a bit short compare with my last cake. Next round I will experiment with a smaller spring form pan of 8inch instead of using 9inch. Also by putting a layer of aluminum foil, the spring form are more securely lock. There was once I pour the whole mixture into the pan and the pan gave way with the mixture spilling all over (old method).

Latest update:
2nd experiment: 
-I tried using the baking sheet and I will never try it again. The baking sheet absorb the oil/water and tear easily when I tried cutting the cake. The aluminum foil is still better.
-Make sure the aluminum foil is the biggest size type - that can cover the entire side of the spring form pan. Else water may seep in when the spring form pan soak in hot water within bigger pan.
-Make sure the water in bigger pan is boiling hot and that it cover at least half of the inner pan height. Be careful as it may be tricky trying to move the pan filled with water into the oven and insert a smaller pan filled with cheese cake filling.
-Tried using a 8inch spring form pan. The cake turn out softer and height is higher. Cake turn out softer could be due to combination factor above: baking sheet, small aluminum foil, water not boiling.
  
Related Links:

Where to buy Matcha Green Tea Powder in Singapore?

I have hunted high and low for this elusive ingredient to make Green Tea ice cream. I have never bought any green tea before in my life. I did not realize there were so many types of Green tea in the market. The first packet that i bought is a Japanese style Green Tea leaf (SenCha)! I was so dismayed but cleverly taught that i can just use my food processor and grind the tea leaf into powder form. I had to learn it the hard way whereby the tea leaf just will not blend with the chilled whipping cream. On my next purchase, I taught I have bought the right green tea because the packaging shows a powdery green tea picture. However I still bought the wrong green tea. When i open the packet instead of powdery texture, i can see round small balls. Apparently its the "compact" version of the usual Green Tea. My hunt continues despite going all over JB to find at Cold storage/Jusco/City Square/Giant and Kota Raya. I also tried looking at Cold storage Sg but it was sold out at the time.


Where i bought my Matcha Green Tea Powder in Singapore?
I drop Meidi-Ya and Carrefour a mail. Meidi-Ya replied me the next day while there was no reply from Carrefour.
I find that Meidi-Ya has great service. When they reply my email they mention the product name in Japanese language and even inform me the price. I took a photo of the mail and show it to the Meidi-Ya customer service and a lady lead me straight to the product. I will definitely buy from them again!

Meidi-Ya: Matcha Green Tea Powder/Maruyu  Omacha Powder  30g  $12.00

Singapore: Carrefour definitely are not selling Matcha Green Tea Powder. Cold storage also sell Matcha Green Tea Powder

More Matcha Green Tea spotted (Latest Update)

$8.65 at Meidi Ya Liang Court

 This pic look familiar to you? thats coz I bought this for my Matcha Green Tea Ice cream~! The smell of the tea is nicely fragrant~! $12 at Meidi Ya - Liang Court


 $6.30 at Fair Price

All the price of the Match Green Tea varies. Some may not be 100% pure matcha green tea (according to my sis). According to the Matcha Green Tea ice cream youtube video that I saw, the lady advice that it is best to invest in a good matcha green tea powder. If you find matcha green tea anywhere in Singapore please leave comments. If you have tried any matcha green tea including the one I posted above pls comment on their quality too.


I am currently using Ten Ren Match Green Tea Powder. It is cost efficient and produce reasonable result. Sold at Purple Cane or selected major supermarket. 7.93oz for less than RM30 (Malaysia).


Wednesday, November 3, 2010

Super easy and quick fried rice recipe

While waiting for my Oreo Cheese cake to bake for an hour, I was hungry and I haven't had my dinner. I have white rice but I do not have any side dishes to go with it. Now I am still wondering why my mum cook white rice only...well...While baking I could clean the pot and dishes from baking, prepare and cook fried rice, eat fried rice, watch tv a while, wash some more, check the cake and the cake is still not ready yet.

I was hungry and decided to cook fried rice with simple ingredients.
Ingredients (1 person)
Rice
1 egg
1 onion - chop
2 garlic clove - chop
Sesame oil, cooking oil, light soya sauce salt to taste.
For the vege I use a handfull green peas.
Spring onion - chop

Steps:
1. Pour in some cooking oil and sesame oil
2. Saute the onion and garlic till fragrant (small fire)
3. Add in rice. Pour sesame oil, salt and light soya sauce.
4. Add in the green peas. You can use long bean also. Or you can be creative and use almost any vege that you have. Saute for about 1 minute.
5. Create a hole at the centre, pour in some oil. Break an egg. Put some light soya sauce on the egg. Wait for the egg to be semi cook. Then mix in the rice at the side.
6. Add in spring onion. Saute for 30 seconds and the rice is done.

I was so hungry that I ate finish my fried rice within minutes! Basically my fried rice only have egg, green peas and seasoning. Simple and yummy fried rice.

LinkWithin

Related Posts with Thumbnails