Adsense

Showing posts with label Kitchen appliance. Show all posts

Monday, July 4, 2016

ZWILLING J.A. Henckels TWIN Signature 6-pc Knife Block Set unboxing


Finally my knife set has arrived after a very long wait from mysale.

So here goes the picture of the unboxing.

About the set:TWIN Signature is ZWILLING J.A. HENCKELS stamped line, offering sharpness to the aspiring cook. Precision stamped from one piece of ZWILLING Special Formula Steel. FRIODUR® ice-hardened blades guarantee optimal balance of hardness, toughness, and corrosion resistance. Hand sharpened and polished, laser controlled edge. The result; knives that start sharper and stay sharper longer. Ergonomic designed three rivet, full tang handle features a ZWILLING J.A. HENCKELS logo.


Box front - explain about the knife. It mention that knives are manufactured in Germany
Side of the box 1

Side of the box where there are description of the contet. Notice that it says knives are made in Germany, kitchen shears and block made in China and sharpening steel made in Taiwan

Let's unbox! What is inside?

content of box


10 hole knife block

My new toys unbox


It include a warranty card that says lifetime warranty

Instruction manual

I am so happy that I finally bought the knife set after many years of waiting! Btw an interesting fact is that the authorise dealer of zwilling offers free sharpening service! 


Friday, December 31, 2010

My new toy: Lazy Suzy from Ikea!


My new toy bought from Ikea! Look like an ordinary piece of wood but it is actually a 15 inch Lazy Suzy! It can turn while decorating cake! Wheeee!~Fun!

Monday, October 25, 2010

Kitchen spree in October

 I went Singapore recently and bought a lot of kitchen utensils. I mainly wanted to get a Braun hand mixer and weighing machine plus a visit to Phoon Huat. I end up finding tonnes of treasure trove and switch my purchase of hand mixer to Philip HR1561 that cost $50 at Courts Causeway Point in Woodlands. Took picture of all my new toys below.

 
 Philip HR1561
 Philip HR1561. Cost $50 and has 350 walt motor. In the box it include beater and dough hooks, 2 year warranty, instruction manual and storage box.

I needed a hand mixer to replace my Elba hand mixer. I realize that my stand mixer is too big to handle certain recipe with small quantity. Which is why I needed a hand mixer!

 Electronic weighing machine from Japan bought for $59.90. This baby is so cute and light! First red button: on/off button. The second pink button: reset the weight if you put a bowl on it which means you do not have to include the bowl measurement when you measure your ingredient.


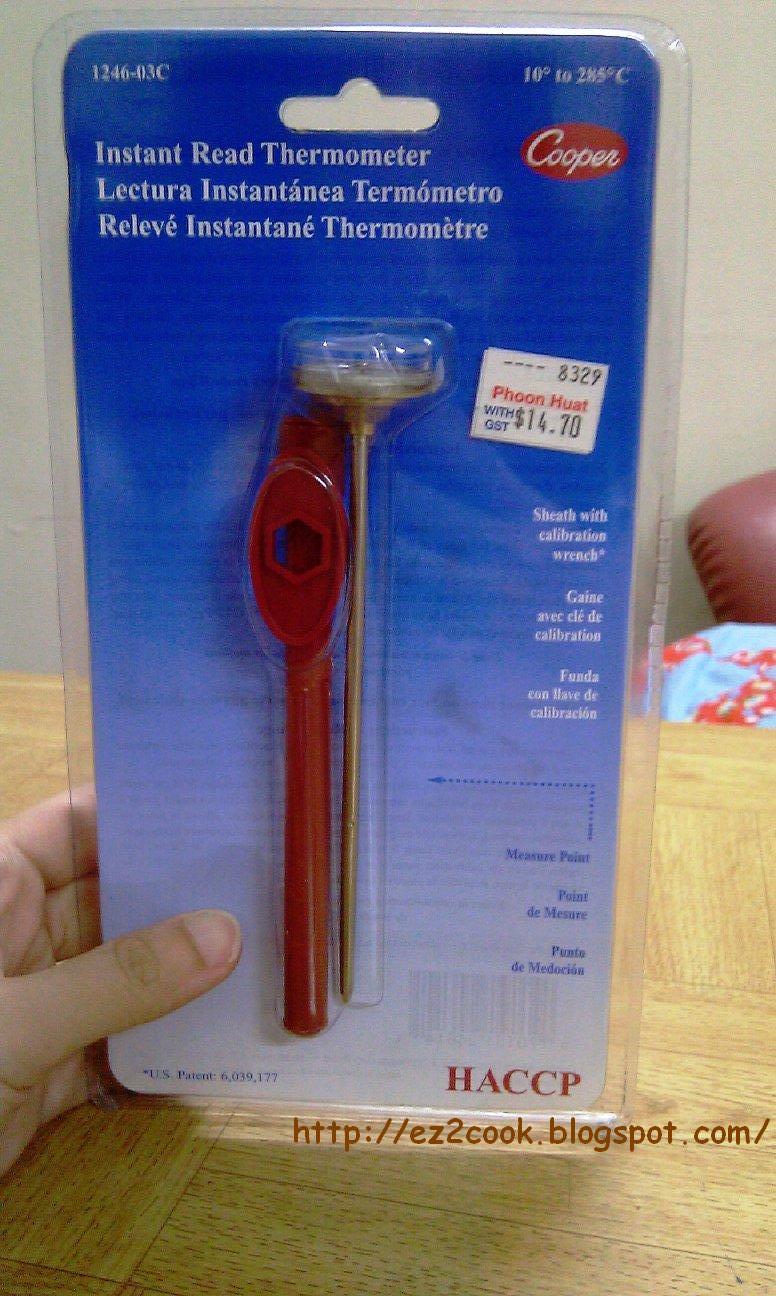
My journey to Phoon Huat prove to be a fruitful journey! I found loads of item that I couldn't find in JB. I wish I can buy ALL of them but I selected a few that I plan to use sometime soon. I bought Instant Read Thermometer, Oven thermometer, Piping bag, Gelatine made from fish and Vanilla pods!

Cooper Oven thermometer. Useful if you are unsure of your oven's temperature. My oven does not state the temperature clearly so I was using some guesswork to get the temperature right. Cost $10.09 at Phoon Huat.

Cooper Instant Read Thermometer. Useful when your recipe calls for certain temperature. Eg the ideal temperature to melt chocolate and white chocolate. Cost $14.70. I am glad i hold of purchasing this thermometer while i was shopping around Metro at Woodlands. Cause the price there was $39.90 for an Instant Read Thermometer (i forget the brand).
 Fish Gelatine! Finally I found a Gelatine that both my Indian friend and Chinese friend could consume when i make cake. Was having a headache to look for a suitable replacement when the ingredient calls for Gelatine. Cost $1.50

 Vanilla pods! Finally i found Vanilla pods in Singapore. I was searching high and low for this elusive ingredient in JB. A lot of western recipe calls for Vanilla pods and its suppose to be more flavorful compare with Vanilla flavoring. I am really happy when i found it! I can also make Vanilla sugar at home from this Vanilla pods.
Cost $10 at Phoon Huat.

Piping bag. I belief its easier to use than the plastic bottle type. Price $3.77

 My Kitchen Shopping spree in Singapore

Tuesday, June 8, 2010

Chocolate, Green Tea and Daiso shopping in Singapore!


Bought many items mainly for my ice cream making. I bought utensils and ingredients plus some delicious chocolates!


I finally found my matcha Green tea at Meidi ya at Liang court near Dhouby Gout station! Cost $12 and weigh only 30g. The bottle is really small.

Extremely Chocolatey White Chocolate. It cost $4.90 and its really yummy! The white chocolate is just nice with some biscuit in the middle. There is only 8pcs inside though.

While at Orchard, I went from ION to Shaw Centre, I stumble upon a chocolate shop that sells various chocolate and cookies at Wheelock. Most of the products are manufactured by Marks and Spencers. Quiet amaze as I thought that they only sell clothing. Didnt expect them to make chocolate too. The products are made in UK. Curious, I bought a few to try. I spend $17.60.

The chocolate chip cookies taste rather normal. I like the chocolate chip as it taste sweet and nice. It cost $3.30. I wish its more crispy and fresh though.


I also bought the White Chocolate and Swiss Dark Chocolate. Hope that they will contribute to my ice cream making!

Sunday, May 23, 2010

Philips 2304 Ice cream maker: Why my ice cream failed and tips to succeed?

I churn the banana ice cream in an air condition room to speed up the process. The ice cream is harder than it looks
 
If you have problems with using the Philips 2304 ice cream maker
-Why my mixture does not turn into ice cream?
-Why it does not churn into ice cream?
-Why the before and after is the same and no ice cream came out?
-Is Philips 2304 ice cream maker a fluke?
-Tips in using the Philips ice cream maker

then this post might be able to help you. This post concentrate on how to make the machine work and it is not referring to the taste of the ice cream.


I am bursting with happiness as my Philips ice cream maker is finally producing ice cream! I failed 3 times making the ice cream and just when I am starting to think that the product is a fluke and thinking of ways of getting rid my 1 week old ice cream maker, I finally succeeded in churning out ice cream! The first 3 times fail in the sense that the mixture i put in does not churn into ice cream. The before and  after is the same, the mixture is still in liquid form. And when I wanted to save the mixture by putting it in a container and pop into the freezer, the next day I tried and the ice cream is hard like a rock. Its hard because ice crystal form around it. Just imagine you are eating large ice cube in mango flavor.

Tips in using the Philips 2304 ice cream maker:
-Read the instruction manual page by page. My first recipe is mango ice cream. After figuring out and buying all the ingredients, I skip reading the manual and jump straight to making ice cream. After the second miserable failure I started skimming through the page and start using the recipe in the book.

-Watch out the quantity. To maximize your success rate, I suggest that you start simple and follow the recipe provided when you buy this ice cream maker. That is because when you get the recipe in the net, they might be giving the measurement base on different types of ice cream maker. As you are new, you might not know how to reduce or increase the quantity base on your ice cream maker. If you put too much then your mixture might fail to churn out ice cream.

-Freeze your mixture first. First time I did not freeze the mixture, second time I put in the freezer for a while, 3rd time I cook the ice cream mixture and put for 2 hours. Fourth time I put a non cook ice cream for 1 and half hour.

-Freeze the cooling disk till its rock solid. In this model, you will need to store the cooling disk till its hard. To ensure it is ready, just shake the cooling disk. If you hear a watery sound means that it is not ready. I find this easier comparing with the manual recommendation whereby "you will hear a crunching sound when you press the bottom of the disc with your thumb". For my freezer, apparently 24 hours might not be enough. The fourth attempt I left it for 48 hours in the freezer.

-Thaw the cooling disk make sure its free of ice. I find this step crucial as i ignore this step the first 3 times. When there is ice stuck on the grey side of the cooling disk, where the stirrer turn, then there will be a weird sound produce. That is because the stirrer could not turn properly and it will turn the cooling disk too. By right the cooling disk should remain still while the the stirrer turn. The fourth time I thaw the ice away carefully with a plastic ruler (please do not use metal utensil as it will damage the cooling disk). Before pouring in the mixture I switch on and make sure that the stirrer is turning smoothly. I stop it to clean the cooling disk as I heard a "wrrrr..tak tak.....wrrrr" which means that it is not turning smoothly. You can start pouring in your mixture once you have check that the stirrer is turning smoothly

-Room temperature. Well this might be a weird method but desperate situation calls for a creative measures. The 3rd attempt onwards, I started making ice cream in a air condition room! It state in the preparation time section in the manual that the mixture will take a longer time in higher temperature environment. I belief this really help to speed things up as I started seeing ice cream appearing miraculourly in less than 20 minutes!

-Dont stop to check your ice cream. On my 3rd attempt, I stop halfway. When i start back there is a weird "tak....tak...tak" sound like something is stuck! The sound is so disturbing that I stop the process, took out my vanilla mixture and realize that the mixture has stuck on the cooling disc

-Watch ice cream making video. It will build up your confidence. There are many ice cream making recipe in Youtube.

-Start simple. If your first few attempt fail its best to start simple. If you have banana at hand, I recommend you try their Banana Ice cream at page 9. Its simple as you don't have to cook it and it does not involve any eggs.

If you still face problem even after reading this post, I recommend that you read the instruction manual and start with a simple recipe. Read the manuals word for word.

Monday, May 10, 2010

Daiso shopping!! RM5 shop

Just went to Malacca Daiso in Pahlawan. During my Malacca trip, I went to Pahlawan and the new Jaya Jusco. I notice that they have a lot of shops that JB do not have. The new Jusco is very modern and a walk inside feels like I am in KL shopping area.

Anyway back to Daiso. Daiso is a RM5 shop for all items. Its similar to Daiso in Singapore that sell for $1.99. They have really great deals in their shop and feature many cheap and innovative Japanese products. If you do your homework you will get really great bargains at Daiso. But there is also items which are more expensive than normal retailers

I bought a few kitchen appliance in this trip. Couldnt resist as I have not seen some of the items or their design are unique. The cup is a measuring cup. From the top left its a cheese grater. The middle is the lemon squeezer. You need to cut the lemon into small pieces and squeeze them. On the top right its to squeeze the garlic into pieces. I bought this is to replace chopping of the garlic. I paid RM20 in total. I am not sure of the price in normal retailers but I had fun shopping at Daiso.

Monday, April 26, 2010

Spring Form pan

The description and care of use. Use non abrasive material to wash the pan. Do note that you have to grease pan before use. 22cm is equal to 9inch.

Price: RM25
Where i buy: Ng Hock Heng Trading Sdn. Bhd. 25-b Jalan Dato' Abdullah Tahir, 80300 Johor Bahru, Malaysia. Tel: 07 3333617. Email: nhhtsb@gmail.com (Wholesaler and Retailer of Utensils & Crockery, Industrial containers, Hardware)

According to Wikipedia: Springform pans are a type of bakeware that feature sides that can be removed from the base. Springform refers to the construction style of this pan. The base and the sides are separate pieces that are held together when the base is aligned with a groove that rings the bottom of the walls. The pan is then secured by a latch on the exterior of the wall. This tightens the ‘belt’ that becomes the walls of the pan and secures the base into the groove at the base of the walls.

I wanted to make cheese cake but I do not have this spring form pan. Lucky for me after looking at a few shops, I found my spring form pan at Ng Hock Heng shop near the DNP and Banafee area. The shop is a wonderland of baking utensils for baking fanatics. They are the whole seller so their prices are reasonable and the owner of the shop are honest. Initially i choose a 20cm/8 inch pan. He told me this spring form pan is very bad, you should choose a bigger one. The clasp of this bigger pan is stronger. Which is very true as the clasp for the smaller pan is very loose. The owner will also deduct the price if you ask for discount. Although they occupy 2 shop lots, they have so many utensils that the shop is in a mess. I literally have to sieve thru the mess to find the spring form pan.

I need the pan as I need to put the crust at the bottom of the cheese cake. Once the cake is ready, use a knife and cut around the cake to make sure it does not stick to the side of the pan. Unlock and ready to eat.

The clasp: To close the clasp

Unlocking halfway

Unlocking completely.

To lock back, align the bottom and the side on a flat surface. Once its align just turn and lock the claps.

LinkWithin

Related Posts with Thumbnails