Adsense

Showing posts with label Electric lunch box. Show all posts

Friday, July 29, 2016

How to make Frozen Chicken Recipe

Since the day that I bought my Pensonic Air Fryer, I have toyed with the idea/fantasy of making fried chicken from scratch! The motivation in making the fried chicken is that air fryer uses less oil compare to conventional method and that I could make "instant" chicken (when i freeze the leftover uncook chicken) in minutes! Further the price of frozen food is getting more expensive and we never know what they put into the frozen chicken. I also love this recipe as I could also include in my electric lunch box plans whereby i just air fry in the morning and I pack it straight to work.

Once I have tried successfully, there is no going back to store bought frozen fried chicken anymore! I have made this recipe 3 times within a few weeks, it is that addictive! The chicken came out moist in the inside and crispy on the outside. As I am heavy on the seasoning, the chicken is pack with great flavors.

For the Flour mixture I have adapted from Sonya recipes with variations while I come out with my own seasoning methods which works! I have initially tried the original recipe from Sonya however i may have miss something as the texture of the chicken was not what I was looking for.

I use the buttermilk and let the chicken rest for about half hour for the buttermilk to absorb the flour. This is a crucial steps.

Did I also confess that I love to collect herbs? I could locate most of the herbs under Sing Long Food Products Sdn Bhd which I have bought from Mercato (Pavillion) in Kuala Lumpur, Malaysia. This brand is also commonly found in other supermarkets. The prices are more affordable compared to the imported herbs. Aside to Sing Long, I was able to locate herbs in Bake with Yen with very reasonable prices.

I will scope out the necessary amount of flour mixture to another bowl during the dipping.  So that I could store the extra unused flour mixture for another fried chicken projects! Thus I could save time by just prepare chicken season and I could skip the extra steps of preparing the flour mixture.

1. This is how it looks like after seasoning the chicken for few hours in the fridge
 
2. Preparing my dredging stations! I have put the chicken on the wire rack to drain out any excess liquid before dredging starts. The top right corner is the buttermilk substitute made by milk and vinegar

3. I have dredge the chicken and put on the wire wrack on clockwise direction. Notice in the picture some of chicken is white powdery and some are orange color? I need the chicken to look like the orange color version which mans the chicken's flour is "soak" with the buttermilk. Roughly about half an hour or faster

4. I have line the pan with wax baking paper, and pour the leftover flour before putting the chicken on top. Note that I try to ensure that the chicken doesnt touch each other. This is so that it is easier for me to repack once the chicken are frozen solid.
 Recipes:
A) Seasoning the chicken
1 tsp paprika
1 tsp cumin
1 tsp salt
1 tsp onion powder
1 tsp garlic powder
1 tsp ginger powder
1 tbsp oyster sauce
1-2 tbsp soy sauce
1 tsp sugar
1-3 tsp Korean cili powder
some water to let the paste come together

B) Flour mixture - can store the leftovers
300g flour
2 tst mixed herbs
1 tsp cumin powder
1 tsp Paprika
1/2 tsp five spice powder
1 tsp salt
1 tsp black pepper powder
1 tsp white pepper powder
2 tsp onion powder
1 tsp garlic powder

C) Homemade buttermilk recipe- If you don't have the real thing
1 cup hot milk (full cream)
1-2 tbsp vinegar
(mix all together, sieve and you will have buttermilk)

Steps
1. Season the chicken for 2 hours or overnight. If the paste is too thick, then feel free to add water
2. Put together the flour mixture and buttermilk. For the buttermilk, I use the full cream milk powder and mix with hot water before pouring the vinegar. You may use fresh milk but you need to heat it as I notice the vinegar reaction slowed down when using the cold milk.
2. Remove excess seasoning by letting the chicken sit on a wire rack before dipping into the buttermilk, followed by flour mixture and let it rest for half hour on a wire rack.
3. Cook in the air fryer for 180 degree C for 20 min followed by 200degree C for 5 min OR you may store the excess chicken by putting the chicken on a tray line with wax paper. Once frozen, then you may keep in together in a bag.


For Pensonic air fryer, I notice that I need to pour some oil on the chicken to cook successfully. Please try and do let me know how yours turn out!

Sunday, July 10, 2016

Electric Lunch Box Recipe: Steamed Egg Custard

The instruction is obtained from the Empress Electric Lunch Box manual. Just in case you have lost the manual, you may refer to the below guide.

Steamed Egg Custard Recipe
1. Break the eggs into the plate and mix evenly.
2. Add proportionate amount of water and salt, and keep stirring in one direction until small bubbles appear in the mixture.

Amount Water Volume for cooking (in th estainless steel container) ml Water volume for steaming (in the main unit) Time
2 eggs  150 200 12

It says in the manual to steam for 12 minutes. However I steam the eggs at the same time as I steam the rice for 30 minutes which does not affect the texture of the steam eggs =)

Electric Lunch Box recipe: How to cook hard boiled eggs

The recipe is obtained from the Empress Electric Lunch box manual.

There is an egg holder provided in the lunch box.

Amount Water volume for steaming (in the main unit) Time
5 eggs 200 25

Place the eggs in the egg holder and put in into the main unit
Cover with the upper lid and steam.

Electric Lunch Box Recipe: How to measure and cook rice

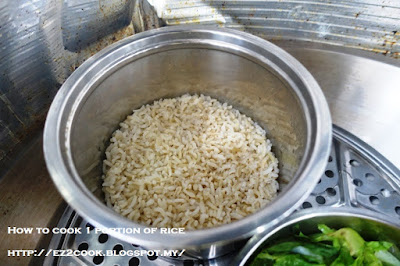
How to cook 1 serving/portion of rice by steaming in a kuali or electric lunch box

I took this from the instruction manual as I find the guide useful. I have tried using both the electric lunch box and the conventional kuali for steaming the rice for single/small portion which works for me! I find the method great as previously I had to use a Rice Cooker and their minimum cooking portion is intended for 2 person. Thus there will be times when there are leftover rice and I had to keep it in the fridge which could be troublesome and unhealthy.

With this method, I could cook rice for 1 person only.

Steps for steaming the rice using the Empress Electric Lunch Box.
1. Measure the rice in the measuring cup provided. I use mine from the Empress Electric Lunch box. The cup size measures 100gram of rice. Fill the rice to the RIM. Not lesser and not more.

2. Place the washed rice in the 1.2Lt stainless steel container and add water.

Below are the guide. I find that the 100gram rice is adequate for 1 person.

Rice (cup)s = grams Water Volume for cooking (in th estainless steel container) ml Water volume for steaming (in the main unit) Time
100g 150 160 30
200g 270 180 40
300g 370 190 45
400g 440 200 60

3. Place 1.2Lt stainless steel container into the Main unit. Pour the water as per column 3 above and close the lid. Switch on the electric and cook as per timing provided in column 4 above.


Steps for steaming the rice using conventional steamer or kuali
Rice (cup)s = grams Water Volume for cooking (in th estainless steel container) ml Time
100g 150 30
200g 270 40
300g 370 45
400g 440 60

1. If cooking for 1 person, Follow the 100gram guide as per above chart with 150ml water and put it in a large bowl. I tested using stainless steel bowl and it works.
2. Put in your steamer and steam for 30min.


Friday, July 8, 2016

Electric lunch box recipe: Steam chicken recipe (fast, simple, time saving method for single portion serving)


Steam chicken recipe
The most common, simple and prepping in advance that I could think of is steam chicken. I would go to the market, buy a whole chicken, ask the butcher to cut into small pieces and de-skin if possible. When I get home, I would clean and remove any fat that is left.

Next I would put two small pieces/one medium size chicken into small containers. Pour the seasoning and ginger then freeze. When I need to pack my lunch, I would just put the container into my lunch box and go to work without further prepping.

This method involve some work during the initial prepping time but it's so much easy and time saving during packing the lunch box. I would prep during the weekend and by Sunday evening, my freezer would be pack with various small containers!

This recipe is also very convenient for prepping a quick lunch or dinner at home.

Below are my suggested recipe whereby it will taste fragrant and salty as I would omit heavy seasoning for vegetable when paired together.

If you are living alone with minimal seasoning on hand, you could even just season with salt and soya sauce. You may tweak as it is a versatile recipe.

Recipe in each container:
Hua tiao chew 2 tablespoon (or replace with brands chicken essence)
Soya sauce 1/2 tsp
Salt - a pinch
Ginger slices - to taste about 2 tsp
Red dates 2 pcs- slice into smaller pieces (optional)
Wolfberry seed 1 tsp (optional)

Steps
Put all the above into the container with chicken. Cover and freeze it. Pack with lunch box or steam it straight from the freezer by transferring to a small bowl and steam in your Kuali.

Wednesday, June 29, 2016

Empress electric lunch box by cosway review and unboxing

I saw my Fren using the empress electric lunch box. She uses it because she is staying alone, renting a room and she make various dishes just with that 1 electric lunch box alone! To me it's a terrific idea. I went and bought the lunch box in a heartbeat since she is satisfied with the product.

The brand Empress is the cosway in house brand. I initially tried to search the product online but I could not locate an online website that sells it. I could only locate other OEM brand in lazada. I only realised that I could only buy from Cosway.

I bought it for rm108 during promo price. The promo I notice happen rather frequently and I was made to understand by my friends that the original price is around rm199. It also comes with a 1 year warranty

After using it, I find this appliance worth every penny as I uses it daily for my lunch in office. I cook from scratch by assembling my raw food in the respective container the night before, bring to work and steam! Off course you can choose to bring your leftovers and steam.

I love that I can prepare at least 3 dishes at one go, to eat my lunch piping hot and eat my lunch with fresh as oppose to overnight ingredients!

My other Frens who saw me using this in office, also went and buy either the same brand or oem from online website. I then get to compare the quality of oem product and empress. My friend bought oem type at rm70++. When compared the  material of the oem product are of lesser quality - metal bowls are thinner, it seems to take longer time to cook, the top tier does not conduct steam well so bottom are cook but the top part are not cook and the plug is not a malaysia plug. Which pretty much convince me that empress is good.

Hower the Empress product has its downside. When heated there is a bit of plastic smell. Further when u cook, the smell of food will emit which might be disturbing to others. I then comfort myself by covering the metal bowl with a normal small plate to minimise the water generated from the steam from dripping into my food during steaming.

Let see what's inside the electric lunch box
In the package it include 3 stainless steel plate, 2 cover, 1cup for measuring, egg holder with stick and instruction manual. 

This is a set. The big, small  plate and plastic cover. the small plate is stack in the big bowl. Plastic cover cannot be use during steamming. It is also not leak proof so be careful if you were to transport soup. It will leak out.

Medium size bowl with cover. Its suppose to be airtight however it is not airtight to me.
Empress electric lunch box. The diagram in a nutshell.

The instruction manual will also teach you how to cook the rice- 1cup of the plastic cup provided with 1and half cup water in the stainless steel bowl.

How to use
I use a normal drinking cup, fill up about 3/4 cup water, pour into the plastic main unit, stack the bowl like in the diagram.plug in and press the one touch button. I general use about 30 min to cook. The vege I will put it in at the last 5-7 min. Do note that when the water run out at the main unit, the cooker will auto shut down as per manual instruction.

If u do not want to use so many tiers, you can omit the middle tier altogether.

You may come to notice why I didn't post the photo of the plastic exterior. This is due to i have left the plastic exterior permanently in my office! So you can just refer to the diagram for an overview.

LinkWithin

Related Posts with Thumbnails