Adsense

Sunday, November 13, 2011

Black sesame Ice cream recipe~

I find that my basic vanilla ice cream recipe that i took from my ice cream maker manual has a few variations. Previous i tried to add in crush cookies and i get cookies and cream ice cream. This time i decided to add in black sesame seed and it still work deliciously~!

Recipe:
Vanilla ice cream (french style)
A)
2 egg yolks
1 egg
125g caster sugar
5g vanilla sugar
5g corn flour 

B)
400ml milk
2 tbsp black sesame seed (crush or pounded into powder)

C)
150ml whipping cream
-Put A) together in a bowl. Beat with the mixer until egg yolks are almost white.
-Gently heat B). After a while you will get the fragrant smell of the black sesame seed. Add half of B) into the egg yolks and beat it with a whisk. Then pour mixture back into pot and use moderate heat to cook the custard. Dont boil as it will curdle. Stop when the custard thickens or coat the back of your spoon. You can use sieve to make sure that there is no egg curdling.
-Take out, let the mixture cool, cover with baking paper and store in fridge. Once its chilled, add the whip cream and stir till everything is mix.
-Pour into ice cream machine.


1. Replace the vanilla sugar with caster sugar then use vanilla bean or essence. Otherwise make your own Vanilla sugar. Its easy by combining vanilla bean and caster sugar. Click here --- How to make vanilla sugar?
2. Black sesame seed. Roast it in a non stick pan for few minutes. Put into a small blender and blitz it till become powder.

Saturday, November 12, 2011

Cookies and cream ice cream recipe~!


Its a sunny sunday and it feels so good to chill and relax with home made cookies and cream ice cream. Since i am using Oreo cookies, you can also call this Oreo ice cream.

I got the recipe from my Philip machine recipe book by combining vanilla ice cream with crush oreo cookies. It is a french style vanilla ice cream whereby you have to cook the egg into custard and required chilling. Off course there is also the "instant type" of vanilla ice cream that doesn't require cooking. I find that the flavor in french style is more pronounce and mix well with cookies and cream. Below measurement is for my Philip ice cream maker. If your ice cream machine has bigger capacity, feel free to increase the amount.

If you dont have vanilla sugar, you can replace with caster sugar and use vanilla bean/normal vanilla essence. For me i use vanilla sugar as i have made it in the pass. It is really easy to make. Click on the link on --- How to make your own vanilla sugar?

Recipe:
Vanilla ice cream (french style)
A)
2 egg yolks
1 egg
125g caster sugar
5g vanilla sugar
5g corn flour

B)
400ml milk

C)
150ml whipping cream

D)
6 pcs of Oreo cookies

-Put A) together in a bowl. Beat with the mixer until egg yolks are almost white.
-Gently heat B). Add half the heated milk into the egg yolks and beat it with a whisk till combine. Then pour egg custard into the milk and use moderate heat to cook the custard. Dont boil as it will curdle. Stop when the custard thickens or coat the back of your spoon. You can use sieve to make sure that there is no egg curdling.
-Take out, let the mixture cool, cover with baking paper and store in fridge. Once its chilled, stir in C)
-Pour into ice cream machine.

To make it into cookies and cream ice cream, crush D). Bag the oreo in a plastic bag and thwack it with a rolling pin till its finely crush. When the ice cream is almost ready, slowly add in the crush oreo biscuit and mix for 5 minutes.

Cream and cookies ice cream - DONE~!

Making cream cheese ice cream recipe~

Cream cheese ice cream decorated with streusel, whip cream and chocolate shaving~
After my cream puff project, I have tonnes of extra whip cream. I wanted to make an unusual flavor of ice cream, while flipping through my recipe book, i instantly clap eyes on cream cheese ice cream and decided to make them~ Its so fun making new flavors that i only heard in Baskin Robbins ice cream shop~ If you love cheese then you will love this ice cream but its best to match it off with some crush biscuit as eating it alone may be a tad overwhelming.

Recipe: Cream cheese ice cream
 A)
350g cream cheese
200ml milk

B)
125g caster sugar
15g vanilla sugar
150ml whipping cream

- Whip B) till stiff.
- Combine A).  Beat till there is no more lumps.
- Fold B) into A). Pour into ice cream machine.

Note: 
1. Its best to beat the cheese first then slowly incorporate the milk. I combine both at once and its quiet hard to beat as the cheese is still hard and the milk is liquid. Some of the mixture spill out.
2. Replace the vanilla sugar with caster sugar then use vanilla bean or essence. Otherwise make your own Vanilla sugar. Its easy by combining vanilla bean and caster sugar. Click here --- How to make vanilla sugar?

Project cupcake~

Chocolate cupcake

Vanilla cupcake
Having fun baking cupcake~ this both is one of my earlier attempt in making cupcake~ as time constraint the chocolate cup cake which should be covered by chocolate cream, ended up i use vanilla butter cream instead~ feed back was very good but i find that vanilla suit well for vanilla cupcake and chocolate cream suit for chocolate cup cake~

Best and worse chocolate chip in Malaysia and Singapore

I have been quiet crazy in making chocolate chip cookies recently and I find that different chocolate chip produce different results. So far my favorite is the HERSHEY'S Mini Chips Semi-Sweet Chocolate Chips bought in Singapore~ i wish that JB supermarket would sell this though~ but i couldn't find it in jb~ whenever i want to restock i would buy 4 packs per trip as I know i will use a lot~

Below is my opinion whether i will try again the chocolate chip or to stay away from them

MUST TRY
1. (10 over 10) My favorite is this HERSHEY'S Mini Chips Semi-Sweet Chocolate Chips bought in Singapore. The size of the chip is smaller than usual and able to spread more evenly in the batter. As the chips is smaller, my baking will usually look more appealing as its entirely covered by mini chips. It taste great and look great. So far i tried a few chocolate chip and i couldn't find one that could replace this yet~

2. HERSHEY'S Semi-Sweet Chocolate Chips
I use this chip before the mini ones. Its the same flavor and taste but bigger in size than number 1. As the chip is bigger, the cookies or muffins will looks like they have lesser chips on it. (7 over 10)

MUST AVOID
 3. HERSHEY'S Milk Chocolate Chips
I bought this 1 time and it took me a few years to finish it really~! Cause i use it the first time and find it too sweet for baking. Unsure what to do with it, i chuck it at one corner of my fridge. In the end i use it for my chocolate chip cookies and would never buy this again. Perhaps this chip has its own purpose that I have not manage to find out yet.

3. Nona Semi Sweet Chocolate Chips
Tried this once and i regret buying it. I bought it in Tesco KSL city and i am not sure why they carry many of Nona's line of bakery product. Many of Nona's line is more expensive than other brands with moderate quality. The taste of this chip is appalling - i couldn't really taste any good chocolate flavor in it. And they ended up making my chocolate chip cookies sweeter than normal though i have reduce the sugar. Better to avoid this entirely.


I would try to update this post if i manage to try any new chocolate chips. Meanwhile if you have tried any, feel free to comment and recommend good ones and to avoid bad ones~~

Saturday, May 14, 2011

Cheesecake Madness!

Green tea cheesecake!


Green tea cheesecake


Family of cheesecake. left out 2 cheesecake! left out Japanese and New York Cheesecake~
Chocolate cheesecake
Mango cheesecake

Tuesday, April 12, 2011

Making Japanese Cheesecake!

I made Japanese Cheesecake today~! Its so fun and the outcome is good! I took the recipe and tips from The little Teochew website. Click here for the tips and full recipes of this cake. The cheese flavor came out light, fluffy and slightly moist. This cake has a slightly heavy egg taste. However due to the light cheese flavor I quickly swop up 3 slices of cake! My parents love it too. They prefer this cake compare with the heavier flavor cheesecake with biscuit base. When the cake is down, after waiting for half an hour for it to cool, i couldnt wait anymore as the smell of the cake is so tantalizing! Such a yummy and delicious treat!

Monday, April 11, 2011

Making Milo Dinosaur version 2.0~

Gotta call this Milo Dinosaur version 2.0 cause the normal Milo Dinosaur would have milo drink at the bottom and top with Milo powder. I tweak mine by topping it with Vanilla ice cream! Yummy and great to eat. As usual the photo doesnt give it proper justice as I took this during night time~ I had another idea for version 3.0~! Hehe just waiting for all the ingredients to be ready~

Making Chocolate ice cream smoothie~!

My blend of ice, vanilla ice cream, cadbury cocoa powder. Top with Vanilla ice cream! I tired putting in caramel sauce but i will skip that next time. Yummy~ At first wondered what to call this drink, its between milk shake and ice blended... my friend suggested calling it smoothie instead!

Sunday, April 3, 2011

Beautiful shots by my frens and family~!

I like to bake or cook food for my friends and families. It is really touching how they choose to show their appreciation with a few lovely snap shots. I am so happy that I really want to post these lovely picture in my blog. Got to say that the snap shots taken by them are way better than what I took on my own!! Looks like i gotta really brush up my photo taking skill!


A piece of Chocolate cake by Nuya

Nuya eating chocolate cake with coffee. Its tea time!

Li taking chocolate cake photo accompanied with Strawberry and Banana! Look so lovely and sweet!

Who knows that a Granola Bar aka Energy Bar could look so mouth watering and delicious? Drizzled with home made Hazelnut chocolate spread. Just imagine Nutella Chocolate on Energy bar~!

Friday, March 25, 2011

Making my mum's Kacang Cake!

A slice of heavenly peanut cream cake! Take this photo at my car poach/garden.

The original peanut cream cake beauty
Finally after almost 27 years, I am making my mummy's kacang cake for the first time. Learn from her once last year and i am happy that i got the chance to make this cake for my friend's bday. Before settling on baking this cake I was helplessly bouncing off ideas in my head on what type of cake to make for her.

You couldnt find cake like this at bakery shop and even if you did they might not taste the same cause it take some work to roast the peanut nicely.

The cake came out beautifully with minor defects. Somehow this cake will sink a little in the middle. I make two of this cake. One is round shape and the other is square shape!

I am so excited! Since small i always pester my mum to make this cake. And when my pestering finally work, my mum always bake this cake for our birthday occasion. Now that i know how to make, I told her that i will be making this cake for her bday and everyone's bday instead! She smile, seem please, took one bite and said that i bake the cake better than hers! Yippy~!

Saturday, March 19, 2011

Friday, March 18, 2011

Clear Water Cake (Sponge Cake) recipe

Clear Water Cake (Sponge Cake)
Ingredient

Post taken directly from The Little Teochew
Recipe
(originally from here and seen at Cook.Bake.Love)

(A)
- 3 egg yolks 蛋黄
- 1 whole egg 全蛋
- 50g corn oil 粟米油

(B)
- 50g low protein flour (cake flour) 低粉(蛋糕粉)

(C)
- 3 egg whites 蛋白

(D)
- 50g castor sugar 细砂糖
- Dash of salt 盐

* Notes from The Little Teochew:
1. I used my vanilla sugar because I wanted a hint of vanilla in my cakes ... people who do not like a strong, eggy smell should add 1/4 tsp vanilla extract;

2. I used Top Flour instead of Cake Flour;


3. I used regular canola oil in place of corn oil ... any neutral-flavoured vegetable oil can be used;


4. I omitted the salt.


1) Beat (A) till well mixed with an egg beater. 用打蛋器打匀(A)。

2) Sift in (B), mix well. 筛入(B)拌匀。

3) Whisk (C) till frothy, add (D) and beat till stiff peaks. 把(C)打至粗泡加入(D)打至干性发泡。

4) Fold in the egg white mixture to egg yolk mixture in 3 additions, mix till well combined. Scoop the batter into paper cups till 60% full. 蛋白霜分3次和蛋黄糊拌匀,用小勺装进纸杯至6分满。

5) Bake in preheated oven at 150C for about 18-20mins. 烤箱预热150度,烤18-20分钟左右。

Hopefully coming project: Strawberry Tart


Got this recipe while thumping through the book 500 Cakes and Bakes by Martha Day. Having watch the anime Yumeiro patissiere, I had really wanted to make their mouth watering strawberry tart! When i saw it in the book it remind me so much of the anime. Hopefully i will be able to make this recipe one day. Hopefully cause I have a lot of dessert and other food making in mind! So here goes nothing....

Strawberry Tart
The tart is best assembled just before serving, but you can bake the pastry case and make the filling ahead.

Serves 6
350g/12oz rough-puff or puff pastry, thawed if frozen
225g/8oz/1cup cream cheese
Grated rind of 1/2 orange
30ml/2 tbsp orange liqueur or orange juice
45-60ml/3-4 tbsp icing (confectioners') sugar, plus extra for dusting (optional)
450g/1 ib/4 cups ripe strawberries, hulled

1. Preheat the oven to 200c/400f/Gas 6. Roll out the pastry to about 3mm or 1/6in thickness and use to line a 28 * 10cm/11 * 4in rectangular flan tin (tart pan). Trim the edges, then chill for 30 minutes.

2. Prick the base of the pastry all over with a fork. Line with foil fill with baking beans and bake for 15minutes. Remove the foil and beans and bake for a further 10 minutes, or until the pastry is browned. Gently press down on the pastry base to deflate, then leave to cool on a wire rack.

3. Best together the cheese, orange rind, liqueur or orange juice and icing sugar to taste. Spread the cheese filling in the pastry case. Halve the strawberries and arrange them on top of the filling. Dust with icing sugar, if you like.

Rough-puff Pastry
Cut 175g/6oz/ 3/4cup butter into small pieces. Sift 8oz/225g/2 cups plain (all-purpose) flour into a bowl and add the butter, 5ml/1 tsp salt, 5ml/1 tsp lemon juice and 150ml/ 1/4 pint/ 2/3 cup iced water. Mix together with a knife. Turn on to a work surface and gather it together. Roll into a rectangle. Fold up the bottom third to the centre, fold the top third to meet it and then turn the pastry a quarter turn. Repeat the rolling and folding. Wrap and chill for 20 min (or pop into the freezer for 5 min). Roll, fold and chill twice more.

Sneak peak of how the strawberry tart look like. Picture taken from the book so its a little unclear...

Tea time! Oreo Ice cream with Banana.. Itadakimasu!!

Enjoying my Oreo ice cream with Banana! Kawaii~ so adorable!! Wanted to cut down on sweet stuff but whenever I have an idea its always something to do with sweet dessert!! What can I do about it when I shouldnt eat anymore sweets? Just make it and enjoy lo! Lol looks like i am totally hopeless and a total slave to sweets now~!

Thursday, March 17, 2011

Making Chocolate Cake

This is the Chocolate cake that I have learn from Aunty Marie. Tried it with her once and now I tried i again on my own. Outlook wise is beautiful and I think i manage to absorb most of her methods.

A piece of heaven!

For a moment i struggle to decide whether i should start cutting the round cake or square cake. They look so adorable that I had a hard time deciding. My stomach start growling while taking photo and finally decided to take a knife and reach to the nearest cake and cut it.....and the rest is history as I munch down on a delicious choco cake!! Mmmnnn... I am in heaven~~

Wednesday, March 16, 2011

Homemade Chocolate-Hazelnut Spread Recipe

I took this recipe from Su Good Sweets

I have some hazelnut which is about less than 100g of the nuts. Quantity is less than 1/3 of the recipe but I decided to make it anyway~! I was curious about the part about the hazelnut oil will come out when there is high friction and heat. Was quiet interesting to really see the nut become tiny bits and when I process it further, oil start to seep out of the nut and become hazelnut butter. The smell of Hazelnut spread is amazing. I was influence to make this when my sis made it herself and recommend it! She wanted to buy Nutella from the supermarket. But when she notice that there is high oil content with lesser hazelnut she decided to make her own Nutella. As usual whatever project she has made has always manage to attract my attention. She found that Nutella hazelnut content is about 18% but this recipe has about 47% hazelnut content.

Actually making my own Nutella doesn't come cheap. A 500g packet of raw Hazelnut itself already cost RM22.50 in Ng Ming Huat bakery shop. Although its pricey I still bought it anyway as I wanted to know how the recipe will work out and its always fun to discover how to make things from scratch. Another good reason to make your own Nutella according to Su Good Sweets blog, she mention that, "As much as I love Nutella, today’s commercial version is actually sugar that’s flavored with hazelnuts and cocoa. You can tell because sugar is first in the ingredient list. And there’s lots of added oil to make it spreadable."

As for my spread, the smell is amazing but the mixture come out a little more watery than I would like. I notice a reader who tried the recipe in the author's blog mention that she only need to add about 1 tbsp oil if we mix the hazelnut long enough to produce hazelnut oil. I will follow the reader advice in my second attempt on the new batch of nuts that I bought.

Ingredient

After spinning a few times. Check out how the hazelnut texture has change and oil oozing out of it.

Once the hazelnut has turn into hazelnut butter, I dump in the chocolate, sugar and oil.

My Chocolate-Hazelnut spread in the jar! Cool and fun project!

Taken form the website:


Chocolate-Hazelnut Spread (easy version)
Yield: about 12 ounces (1 1/2 cups)
2 cups whole raw hazelnuts
1 cup powdered sugar
1/4 cup unsweetened cocoa powder
up to 1/4 cup vegetable or nut oil
1/2 tsp vanilla extract
  1. Preheat oven to 350° F. Place hazelnuts in a single layer on a shallow baking pan. Toast until the skins are almost black and the meat is dark brown, about 15 minutes. Stir the nuts halfway through baking to ensure an even color.
  2. To get rid of the bitter skins, wrap the cooled hazelnuts in a clean kitchen towel or paper towel. Rub until most of the skins come off, but don’t worry if some remain.
  3. Process nuts in a food processor, scraping down the sides of the bowl occasionally, until they have liquefied, about 5 minutes. First, you will get coarsely chopped nuts, then a fine meal. After a little while, the nuts will form a ball around the blade, and it will seem like you only have a solid mass. Keep processing. The heat and friction will extract the natural oils, and you will get hazelnut butter!
  4. When the nuts have liquified, add the sugar, cocoa and vanilla. Slowly drizzle in enough oil to make a spreadable consistency. Since the mixture is warm, it will be more fluid now than at room temperature.
  5. Transfer the spread to an airtight container, and store in the refrigerator for 1-2 months. For best results, stir the chocolate-hazelnut spread before using.

Tuesday, March 15, 2011

Healthy Granola Bar

I got this below post from my amazing sister Shirley who I look up to since she is the queen of DIY at home. She could DIY her own moisturizer, ice cream, nutella chocolate and this round is energy bar. Actually she made this a long time ago and I am posting her recipe now. Hopefully I will be able to find all the ingredients and start on my own soon~!

For those interested in the granola bar recipe:

To make it HEALTHIER,
1)you can substitute part of butter, i did 3/4 butter replacement
with apple sauce (weight for weight)
2)you can replace butter with good oil if you want
eg,
-grape seed oil
-olive oil may be too strong, but i think my sis in law uses olive oil
3) you can replace white sugar with
-raw sugar
-organic sugar
-honey
corn syrup is not healthy but i heard its tasty and used widely in commercial granolas

you can use any dried fruit, just replace as per portion stated below.
you can replace any nuts.. use your imagination
you can replace wholemeal flour (though this is better) with white flour if wholemeal is not available
if you dont have crisp rice cereal.. perhaps u can add bran or just add more flour

good stuff to add:
flaxseed (grinded ones, cos the ungrinded one may just shoot out of your bowel system without being absorb)
wheatgerm- good for you
peanut.. heaty ler.. eat less.. eat more almond.

Sunday, March 13, 2011

Making Indian style Dry Curry Chicken

Dry Curry Chicken Indian style. Learn from my Sifu in Seremban Aunty Marie~!
While in Seremban I manage to learn a new dish thought by Aunty Marie! I was ecstatic as she is a great cook and I am happy to learn a few tricks and dishes from her. During this trip she thought me to make Dry Curry Chicken and Chocolate Cake. I would attempt the chocolate cake on my own and post it soon.

Aunty Marie version while i was cooking with her in Seremban. Looks like I have a long way to go to cook it her way
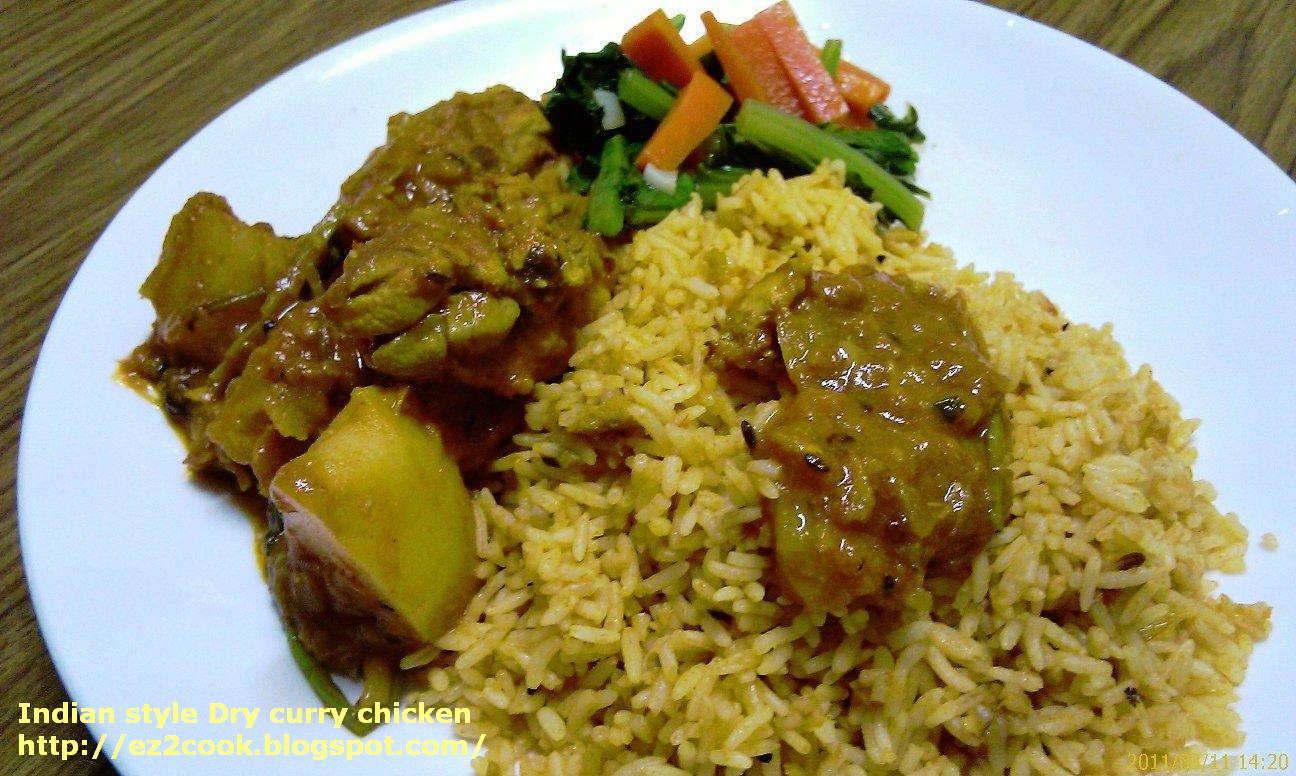
Serving Aunty Marie dry curry chicken with Panneer rice and vege.
When i learn this dish from her there wasnt any measurement of ingredients. So below is a rough estimate of the ingredient required. On my next attempt I would add in more water and cook the chicken longer at stage C before proceed to dump in the powder and tomato. That way it will shorten the time to cook the curry part and chicken wont burn and dry.

Ingredients:

How to cook Indian style Dry Curry Chicken

A)
Cinnamon - 1
Star anise - 1
Cintan putih - a pinch
Cardammon pods - 3
Clove - 4
2 pandan leaf
2 curry leaf
4-5 medium size onion cut into slices

B)
1 small chicken or half a big chicken. Chop into pieces
3 big potato peeled and cut into cube

C) Dice below with food processor
8 clove garlic
2 inch of ginger
2 small tomato or 1 big tomato

D) This are rough estimate. Season to taste
Meat curry powder - 3 - 4 teaspoon
Tumeric powder - 1 - 2 teaspoon
Cili powder - 1 - 2 teaspoon
Cintan putih in powder form. 1 - 2 teaspoon
Salt season to taste - roughly about 1 teaspoon

E)
2 small tomato or 1 big one cut into cube

F)
A handfull of coriander leaf (I use a type of fragrant leaf in my garden)

1. Stir fry (A) till onion become brown
2. Put in (B) and stir fry for few minutes. Add in (C) and stir fry. Cover the kuali for 5 -10 minutes and let the juice soak into the chicken. Check intermediate and stir fry to make sure it wont burn. (Note to self: Best to make sure the chicken are half cook at this stage as curry powder can burn easily)
3. Stir fry (D) and (E). After a few minutes add in some water otherwise chicken will dry up. Amount of water depends on individual.
4. When potato has soften add in 2/3 of coriander leaf and add in the rest when serving the chicken.

How to cook Panneer Rice
After serving the chicken, there will be some curry juice in the kuali.
Scoop up a few cup of rice and stir fry the rice. I have switch off the gas at this point as the rice is still warm. You will get delicious yummy rice that goes really well with the curry chicken!

Picture for illustration in making the curry chicken
Slicing the onion
After dicing with food processor the tomato, garlic and ginger
3 Russet potato dice and put into water to prevent the potato from changing colour
Onion and tomato
I use half a large chicken
Rempah: Cinnamon, Clove, Cintan putih, Star anise and Cardamon pods
Dumping into kuali and Stir fry A
Cook till onion has brown
Add in the chicken. Stir fry and pour C inside and cont stir fry. Let it cook for about 5-10 mins
Add D and E. Stir fry for few minutes then add some water.

LinkWithin

Related Posts with Thumbnails