Adsense

Wednesday, August 23, 2023

Lunch Box Meal for 1: Lunch - Chinese Potato and Mince Meat Stir Fry

Cooking time 10-15min (with most items prep the day before)


Chinese potato and mince meat dish serve with vegetable, mushroom and rice

These days I have been waking around 5.30am to cook my meals for the office and It will take about 1 hour to complete 1) 1 breakfast, 1 lunch and 1 tea break from scratch with some prep work done the day before for faster assembly the next day. Steaming the rice using my electric lunch box takes about 30min. I have been saving the funds for my meals to buy books for my kids. At the same time, I could decide how much oil and the type of meat used (organic). It would be faster if you only want to make 1 meal but I cover all my bases. I also do have bigger appetites compared to my peer 😅

I made the sauce in advance, then when I want to use it I will use a dry spoon and take out 1 or 2 teaspoons. These are the little things that help in speeding up the process. I keep it for about a week in the fridge and ensure the utensils are dry.

For the meat, I store it in the silicone ice cube tray that I use for my baby. Then I will take out the portion that I want for my lunch.

To me the dish is easy to cook as there is no need to marinate in advance, common ingredients (mainly with a potato and meat and you are good to go) and takes about 10 min to be ready. The main waiting time was to wait for the potato to soften.


Chinese Potato and Mince Meat Stir Fry

“PNB” stands for Prep the night before

2 – 3 clove mince garlic “PNB”

2 cube of mince pork “PNB”

1 potato slice soak in water to remove starch. Ideally half an hour, but I just soak, wash and change water, drain then cook

2-4 tsp Sauce (I prep this a few days ago to use a few times as you see fit) “PNB or in advance”

1 tsp Chinese cooking wine

Cornstarch solution – about 1 teaspoon with pipe water


Sauce prep – I don’t use all the sauce at one go. I use the sauce a bit for multiple dishes. You can reduce it further if you only want to use it for 1 to 2 times a week.

1.5 tablespoon oyster sauce

1 tablespoon light soya sauce (low sodium – I bought mine in Jusco and it is a Japanese brand)

½ tsp sugar

½ tablespoon sesame oil

1 tsp  dark soya sauce (I am not a fan of my food looking very dark. Add more if you are)


Slices potato soak and wash away the starch

Food prep - 2 minch meat cube, garlic for current dish and vege dish, sauce

........

Steps:

1)      Put some oil in a pan, stir fry garlic, followed by minced pork.

2)      Add the sliced potato stir fry then add water to cover the potato.

3)      Put about 2 tsp of the sauce

4)      Cover the pan and let it stew for 6 minutes. Adjust the fire accordingly about medium to small.

5)      Test that the potato is soft.

6)      Add Chinese cooking wine followed by cornstarch solution to thicken the sauce


Other side dish

I pair it with shimeji mushroom, any green vegetable, garlic and a bit of salt stir fry.


Breakfast

Bread with condense milk, cheese and egg


Wednesday, April 12, 2023

Zucchini muffin (Baby, toddler and adult) Salt and sugar free


Made about 9 pcs cupcake

INGREDIENTS:
A)
1 large eggs

1/4 cup applesauce/yogurt/mash banana

1/4 cup honey (above 1 yr old)/4 kurma paste + top up with milk for the remaining space in the cup

1/8 cup or 32g any mild tasting oil
A bit pure vanilla extract

B)
1/4 tsp or 0.7g cinnamon powder

1/2 tsp baking powder

1/4 tsp baking soda

1/4 tsp salt (i didnt put)

1 cups flour (or almond flour if gluten free)

C)
1 cups shredded zucchini, not squeezed and packed

Optional topping
Walnuts, chocolate chip, chia seed, fruit like blueberry or strawberry

1. A) Mix wet ingredients, I use handblender to ensure wet ingredients are well mix. No need to beat till fluffy.

2. Add B) by sieving the dry ingredients and stir with spatula

3. Shred C) and add in. No need to squeeze out water. Prefer to use the smaller shredder hole. Stir with spoon. There will be more liquid ooze out to mix wet the batter.

Bake at 375 fahrenheit 20m. Poke with stick to check for doneness 

Wednesday, March 29, 2023

Baby Simple Tomato Pasta Stir Fry Pasta -


Below is a pasta recipe with the paste made from scratch that baby eats. There is no salt and sugar.

Pasta paste
Onion - About 1 tsp
Garlic 1
Tomato paste 1 cube
Meat - Can be meat of choice/Fish
Cherry Tomato
Organic Baby Mushroom - 1 (its a small pcs of mushroom)
Vegetable of choice

Cook the pasta seperate till soft

1. Add butter/olive oil then stir fry onion and garlic
2. Stir fry mushroom
3. Add meat if any
3. Add tomato paste and add water.

Note: Tomato paste are made in


advance and consist of cherry tomato, celerry, carrot and holland onion. Blend then cook with oil (tumis) till the water reduces.


Saturday, March 25, 2023

Baby breakfast ideas

 1. Oats 

- With fruits like banana, dragonfruit, mango, apple

- With dried fruits - raisin, kurma

2. Pancake - Banana, apple, dragonfruit

3. Steam Tofu - with blended dragonfruit or mango

4. Baby waffle

130g flour, 1 egg, 240g milk, 5g baking powder, 28g melted butter, sugar replace with kurma paste - mix


5. Mash potato and creamy pumpkin sauce.

Sauce - blend puree pumpkin + cream cheese + milk. Cook to reduce liquid. Can use on pasta. Can add ikan bilis powder

Sunday, October 16, 2022

Yogurt Chia Seed Blueberry Kurma (Baby, Toddler, Adult)

 2 - 4 tablespoon yogurt (original, full fat, no sugar)

Some chia seed (baby max 1/2 tsp) stir mix

1 to 2 round cube Kurma paste (made ownself by soaking kurma for few hours, take out seed, blend and store in silicone cube). I uses kurma when the fruit is not so sweet and if baby don't like sour

Fruit of choice (Puree Nangka/Mango/Dragonfruit)

Sweet Sour Pork or Chicken (Adult or Toddler)

Sweet Sour Pork or Chicken (Adult or Toddler)


A)      Marinate

200g streaky pork/chicken fillet/boneless chicken breast – cut to cube

1 tablespoon Shaoxing huatiao wine

1 teaspoon light soya sauce

1 teaspoon oyster sauce

1 egg white – help to make it crispy

1 tablespoon corn flour


When want to fry, coat with tapioca flour


B)      Sauce

1 – 2 tablespoon tomato sauce

Blend tomatoes

1 teaspoon Worchester sauce

60ml/cup water or more.

Cornstarch solution – cornstarch mix with water

Optional – capsicum, pineapple and tomatoes


Cook the sauce then only add the fried meat and serve.


Serve with rice, bak choy, broccoli carrot, ubi


Next time I will make the sauce in advance, buy the meat – add the sauce to the meat before freezing. Lay the meat flat. Sauce also the day before prepare – keep in container and put in fridge.

French Toast [For Adult, Toddler and Baby]

 French Toast [For Adult, Toddler and Baby]


Serving size 10 bread

Beat the following:

4 Eggs

180ml milk of your choice

¼ to ½ tsp cinnamon

Sprinkle some nutmeg (optional)

20g butter

[If make for baby, take out some and put some Kurma paste – 1 cube to 2 small]

20g sugar (for adult and toddler)


Dip the bread into the batter then cook. Can add butter when cooking.


Next time would probably prepare batter first the day before

Green Creamy Pasta – Green Pea and Broccoli [Adult, Toddler & Baby]

A) Pasta (spiral) Alce Nero Organic Pasta Fusilli [80g adult / 40g kids for 1 serving]


Note: If baby may need to use baby noodle/pasta and make the pasta more watery


B) Sauce

Onion – 1 (chop)

Garlic – 3 to 4 clove (chop)

Green Pea – 1 large yogurt cup (frozen Watties brand)

Broccoli – 1 large yogurt cup

200ml Santan/Coconut Milk - 1 small pack / Will try milk next time (Ayamas brand)

Or use full cream milk (optional can add cheese/mushroom powder/some pepper)

(No salt/No sugar added)


1.       Cook pasta of choice, I use spiral pasta

Boil - Put some oil and salt. Drain and set aside

For baby use baby noodle. For sauce may need to add water for less thick.


Pasta Sauce

2.       Put Olive oil or any oil, stir fry onion and garlic. Add in green pea and broccoli. Stir Fry

3.       Blend, cool then keep

Next time will make in advance the pasta sauce. I keep the leftover in silicone cube frozen

Thursday, May 23, 2019

Simple fried rice recipe

I sometimes wake up at 5.45am to prepare for 1 or 2 pax to bring to work. As my time limit is 15min (#flash cooking) I need to find something easy. As I am slow in prep work I will try my best to prepare seasoning, cut the fruits, onion, garlic, vegetables and meat (unless its frozen) ahead of time.

Recipe
Overnight rice _ I use brown rice 1 cup with 2 and half cup water in rice cooker the night before and chill in fridge.
Vegetable _ corn/home grown kai lan. Can also use carrot and bean
Fish cake (optional)
Meat (slices of chicken / pork / prawn ) season with salt
Sauce _ I uses the regular eating spoon ( 1 and half tablespoon light soy sauce, some dark soy sauce, some white pepper, 1 tsp sesame oil
2 eggs
1 mid size onion and 4 clove garlic _ prepared the day before


Cooking
1. Heat a non stick pan or wok. Add in oil. Stir fry onion and garlic, meat, vege (hard type), add in sauce. Put in the rice (seperate if any rice clump together). Create a hole in middle with spatula, add oil if use normal wok (I didnt add as mine is non stick) break 2 eggs season with soy sauce, sesame and pepper. Cover egg with the rice and stir it. (If have time you could beat the egg, pour on non stick with oil, pour egg in 1 layer. Cook and cut into slices). Lastly put in vege (soft type) then done.


Wednesday, May 22, 2019

Mum simple curry puff recipe

This are my mum recipe and I always ate a lot of it. I wanted to make a batch which I have tried to freeze it and bake it in air fryer whenever I just want to pack for my breakfast to work! It's really easy, cost efficient, time saving and more healthy since the one bought outside are all fried with very little meat in it.

Tips- dont put in boil eggs if intend to freeze it. Mum was saying freezing boil eggs are not healthy for man.. lol.. not sure if it is those old wife tale but I shall just follow.

Ma karipap recipe
Filing
Pot
A) 400-500g potato – Boil till fork can go in
B) Pan
i) Small pcs of Kayu manis - half a finger
ii) 200-300g bawang besar - chop till fine
iii) 3 tablespoon curry powder
1 tsp jintan manis powder (wash on sieve dap with towel, dry fry for less than 5 min and grind)
1 tsp sugar
1 tsp salt
iv) 300-400g daging chicken, Minch pork
v) 2-3 stalk curry leaf

Dough
i) 500g flour
Half tsp salt
ii) 1 egg – small
95g cooking oil
iii) Half cup cold water. If dough don't stick then put more water

Filling Steps

Boil the potato 15-20 min.use fork to check for doneness. Even if u off the fire, potato will continue cooking in the hot water.
1. Put 2 tablespoon oil. Fry the Kayu manis till fragrant (medium fire). Then put onion until soften.
2. Meanwhile add jintan manis, curry powder, salt and sugar into the meat. Stir and mix.
3. Put the meat into the frying pan and cook till cook which take around 10 min. If too dry when cooking, can add a bit of water.
4. Cut the cool potato into cube. And add the potato into the fry pan and 2 -3 stalk curry leaf. Mix it. Too dry then add water during cooking. Put on tray to cool. Divide into 4 and use on the dough proportionately.

Dough Steps
1. Put on big plate, put the flour and salt. Make a hole in the centre and put egg, oil and water mix it. if can't bind then put a bit water till bind. Water cannot put too much as it will fail. Use hand. Use medium strength. Set aside and rest 15 min. Divide into 4 portions. Around 15gram dough that make 24 curry pap

My mum will fry the curry puff. If bake then sapu egg on top so it b glossy colour. Tray put a bit of oil to avoid sticking.

My style is after I made the curry puff I will arrange in a tray, freeze it. When heating, I will just put some oil on freeze curry puff and dumb into air fryer. 

Sunday, March 18, 2018

Empress electric lunch box by cosway - How to use (Picture)

How to use the Empress Electric Lunch Box

I have previously written about the unboxing of the lunch box and how please I am using it. I notice a reader commented that they are still unsure on how to use this electric lunch box despite reading the user manual and my posting on the unboxing.

Initially when I started using it, I was also confused since this is a fairly new concept of cooking.

Thus a picture says a million words. So I present to you a picture and a guide. I hope it helps you! There may be grammar errors, but I was trying to get to the point instantly.

Just remember not to put too much water, otherwise it may overflow and damage your electric appliances. In a way, you may liken it to steaming food in a wok - just that instead of using gas, you are using a plug instead. 

Oh I also like to cover my pot with those tea cup plate [not in the picture] to prevent steam water from dripping into my food. That is entirely optional for you to do.

There are various brands of electric lunch box in the market but I really like this brand (quality material, plug that is compatible in Malaysia and adequate heat distribution just to name a few). I have been using this for 3 years now and it is one of those little investment that gives you tonnes of benefit from cost saving to a better health from home cooking.

Happy cooking!


Sunday, October 15, 2017

Versatile Basic Fried Chicken / Katsu Chicken Recipe

I love making this recipe. It is simple and I prefer to buy the Chicken Fillet parts in the supermarket.

I would make a batch, and laid it flat on the tray (I save the plastic tray packaging), freeze it and whenever I want it, I would take out the required portion, put it into my air fryer, drizzle some oil on it, bake it for 15-20 min in an air fryer at 200 Celsius. Viola I have my fried chicken in minutes! It is like making your own instant fried chicken.

Though the recipe is basic, it is still tasty and you could eat it by itself.

Below are my all time favorites~~
1) Chicken Burger patty - Sandwich between bread and put your favorite sauce and lettuce. You would have a Chicken Burger in minutes! This are one of my favorite choice when I bake the loaf bread.

2) Teriyaki Chicken - I just bought the Teriyaki sauce and drizzle some and eat together with rice and broccoli

3) Japanese Chicken Curry - I use the curry that was sold in a cube. I make the soup base using carrot and onion. Then add in the cube and cook till the curry thicken (which I use my happy call for the water to evaporate faster. You may use a shallow pan). Then I would match it with rice and the fried chicken.

The katsu chicken calls for panko crumbs which are bread crumbs thus I uses bread crumbs. The bread crumbs that I bought are pack in 500g.

There is no fix weighing measurement on the recipes. So far I still have leftover bread crumbs after I have done about 1.5kg of fillet. I will just store in the fridge for those unused bread crumbs.

Recipe:
A) Marinate
500g Chicken fillets
Salt (About 1/4 tsp or to taste)
Pepper

C) Dipping station
Put 2 tbsb Plain flour into a plastic bag
Beat an egg in a bowl
Put some bread crumb into a plastic bag. If not enough then add more bread crumb accordingly.

Steps
1) Season chicken with Salt and Pepper to taste, set it aside for about 20 min. Meanwhile prepare the dipping ingredients while the chicken marinate.
2) Put all the fillet into the flour bag. Shake the bag. The idea is to coat it lightly with flour.
3) Dip into the egg
4) Put the chicken into the bread crumb bag. Shake the bag to ensure the chicken is coated.
5) You may fry it, air fry it for 15min at 200 celcius or you could lay the raw fried chicken on a flat plastic tray that was line in plastic bag, bag it and freeze it for future use.


Saturday, October 14, 2017

White loaf bread recipe - how to use wheat flour (tepung gandum) / mid protein flour / all purpose flour to make bread

How to use wheat flour, plain flour, all purpose flour for bread making
I have ran out of Bread Flour or High Protein Flour and I have a bag of Vital Wheat Gluten just lying around after a 1 time use from certain baking project and a few bag of wheat flour. It got me thinking how do I adapt both of this ingredients together to make my bread.

a) Vital Wheat Gluten is the natural protein found in wheat. A small amount added to yeast bread recipes improves the texture and elasticity of the dough. The amount to add into your flour depend on the protein level of your flour which is normally indicated under the percentage of protein in the flour. For example if your flour is just 10% for every 100g then you could add around 6g of Vital wheat gluten for every 100g as high protein floor is around 12-16% protein level. However I did not follow this principle. I added more. So far the results did not back fire.

b) As you know the high protein flour will encourage the bread to rise better as compared to mid protein flour. The less the bread rise, the harder the bread will become.

At first I tried to combine this two ingredient: wheat flour which is the most common flour together with vital wheat gluten but it still doesn't rise the way I want it. The bread was rather hard and compact.

2nd time I experiment again by combine with Bread Improver. I added too much and it turns out, the bread rise was rather unstable - it rise very fast but deflated. The bread also tasted soupy.

c) Bread Improver is a mix of various acids and enzymes that serve to strengthen the gluten in the flour and feed the yeast, both of which yield a better loaf. Every 500g of floor, you may add 5g of Bread Improver.

As the saying goes, the third time is a charm. Finally my bread turn out right after all the hard lessons that I have learned!

Oh yea, I also like to weigh my dry ingredients in a few bags (like your very own premix) if i know I will bake again to save time and hassle. I only added the instant yeast, liquid and oil during the actual dough making process. I notice that if I chill the premix, I need to put lesser liquid otherwise the bread will not come out right.

Below are my recipe to success! Do note that some of my flour doesn't have a brand thus did not specify the protein level. I just added more Vital Wheat Gluten but I follow the ratio of Bread Improver to the T.

Bread making is a labor of love. You could buy bread anywhere and it is time consuming but all worth it when you have the end results.

Recipe:
A - Tips: I will bag this into a few bags in advance and store in fridge to save time
450g wheat flour (Tepung Gandum) / plain flour / all purpose flour. Optional: Substitute 100g flour with whole meal flour.
50g Vital Wheat Gluten
5g Bread Improver
5g Salt
30g Sugar

B - use on actual dough making
250-320g water / milk (the actual is 320g water. But if I store the premix [step A] in a fridge, the premix will have trap some moisture so I will start with 250g water then slowly add if it was not enough)
10g instant yeast

C
30g butter / olive oil / grape seed oil (my preference is olive oil)

Steps:
1) Mix in A and B in a stand mixer. The amount of water depend on the dough - I will use my hand and knead the dough whereby if it is too hard then I will add a touch more water and continue beating. The amount of water would be just nice when i stick a finger into the dough and some of the dough stick to my finger. I would continue beating till the dough feels elastic, almost smooth and soft (but not too soft).

2) Add in C at low to medium speed. I notice if I use high speed, the risk of the dough splitting is higher.

The end result is that when you stretch the dough it will be elastic and you could do a windowpane test.

Proceed to let the dough rise for 1 hr by covering the bowl with a wet towel. Shape the dough and put into the bread loaf pan that has been line with non stick baking paper. Let it rise for another 1 hr.

3) Bake (I have my little quarks when it come to baking loaf bread. I do not like it if it is too brown. I like it light brown but I want the inside to cook as well)

At 190 Celsius - Bake for 12 min. Lower the temperature to 160 Celsius for 20 min. Remove bread from bread tin, flip it upside down / side way and put on tray - bake for 20-30min.

I would love to hear your comment on this recipe or what method you use to make nice bread out of plain flour!

Cheers n happy baking! ;)

Sunday, July 31, 2016

Shanghai moon cake

I have tried this and the results are great! I will definitely make this recipe again.
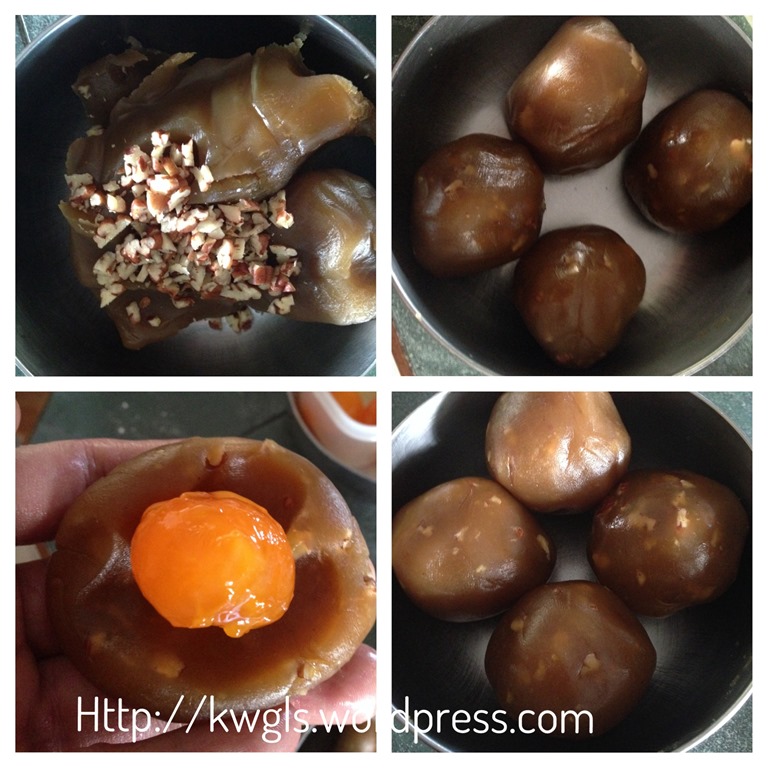
I have obtained the recipe and picture from Guai Shu shu

Short Crust Pastry
  • 80 grams of butter, chilled and cut into cubes and keep in the fridge waiting for later use
  • 1 egg, lightly beaten
  • 200 grams of self raising flour, sifted
  • 40 grams of sugar powder
  • 30 grams of custard powder
  • 20 grams of milk powder (not in picture)
  • 1-2 tablespoons of milk (not in picture)
Fillings
  • 4 salted egg yolks (pre-steamed for 5 minutes or microwave for15 seconds)
  • 50 grams of chopped walnuts
  • 350 grams of lotus seed paste
Egg washing
  • 1 egg yolk plus 1 tablespoon of milk plus a few drops of cooking oil, beat and sift
Others
  • Some melon seeds  for decoration
  • Some sesame seeds for decoration

STEPS OF PREPARATION
  • Preheat the oven to 180 degrees.
IMG_1898
Picture obtained from Guai shu shu site
  • Mix the chopped walnuts to the lotus seedsfillings, knead until well mixed. Divide into 4 balls (or your desired number of balls), wrap a salted egg yolk in each ball. Shape round and set aside for later use.
  • Sift custard powder, self raising flour, icing sugar and milk powder in a bowl. Add the cold butter and use fingertips to rub the butter until it resembles some crumbs. Add the beaten egg yolk and cold milk, lightly knead until it forms a pliable dough. If the dough is too dry, add teaspoon by teaspoon of milk gradually.

  • Divide the dough into 4 equal balls (or your desired number of balls). Take one ball, flatten the dough, wrap a ball of filling, seal the edges and transfer to the cupcake cups or a lightly greased tray.  Egg wash the dough as thoroughly as possible and baked in the oven for 10 minutes.
  • After 10 minutes, egg wash for the second time and while it was wet, put the melon seeds and sprinkle with some sesame seeds. Send back to the oven and baked again for another 10-15 minutes. The baking time is for your reference and depends very much on the size of your moon cake. (Note: Alternatively, you can choose to egg wash once, but you have to put the melon seeds and sesame seeds once you do your first egg wash).

CONCLUSION
This is the ratio of one filling to one skin (1:1) However, do make provisions for yourself and choose a ratio that you are most comfortable (possibly 1.2 skins : 1 filing) with and come out with a presentable moon cake. This dough can be rather dry, remember: Add cold milk TEASPOON BY TEASPOON until you are able to handle it. Handling shall be light and swift for the pastry.

Char siew recipe by meatman

I have tried this and it appears simple and easy to execute! There is no need for special sauce purchase.

I obtained the recipe from meatman  but I cut down to a quarter of the recipe to fit into my air fryer at 160 degree for 15 min, glaze and continue for another 15 min at 180 degree.

Below is the original recipe. I will continue trying for other char siew recipe as there is a few variations!

Servings: 6
     
  • Time: 30 min

  • Skill: Easy

Ingredients

  1. 2kg of pork shoulder
  2. 2 tbps of five spice powder
  3. 2 tbsp of white pepper
  4. 3 tbsp of sugar
  5. 4 tbsp of light soy sauce
  6. 2 tbsp of dark soy sauce
  7. 3 tbsp oyster sauce
  8. 3 tbsp taucheo (beanpaste)
  9. 2 tbsp chinese rice wine
  10. 8 tbsp of honey

Instructions

  1. Cut 2kg of pork shoulder
  2. Add the five spice powder, white pepper, sugar, light soy sauce, dark soy sauce, oyster sauce, taucheo (beanpaste, chinese rice wine, honey and mix them up even with your hands
  3. Cover and let it marinate in the fridge overnight
  4. On the next day, lay out the meat on an oven wire rack
  5. Roast them in 2 batches, for 15 mins in an 180 degrees celsius oven
  6. When done brush marinate sauce on meat
  7. Then back in the oven again for another 15 minutes
  8. Once done, drool!

Saturday, July 30, 2016

Hot and Spicy Korean Rice Cake Recipe

Hot and Spicy Korean Rice Cake Recipe
 Korean Spicy Rice Cake Recipe
I am crazy about Korean recipe these days after watching Home Food Rescue. I then try to get my hands on the Korean basic ingredients in Ampang. One thing that caught my eyes are the Korean Rice Cakes. This is a good basic recipes if you are new  in venturing into Korean Cooking as it only require a few korean ingredients like the rice cake, hot pepper flakes and hot pepper paste.

Do note that both the rice cakes and Hot Pepper Flakes are recommended to store in the freezer as they dont last very long when store in the fridge.

I have followed the steps  and soup making by Maagchi but came out with the ingredients combination myself. As this recipe are rather adaptable - meaning that if you prefer rice cake, then you could put more rice cake or if you prefer fish cake then you could add in more fish cake. The key is in adjusting the seasoning under C, whereby if you prefer less spicy/sweet then you put less and gradually increase till it is season to your taste.
Ingredients
Hot and Spicy Korean Rice Cake Recipe - Portion for 2
A) About 2 1/2 cups of soup
4 cups of water
7 large size dried anchovies, with heads and intestines removed
6 x 8 inch dried kelp

Steps: Boil for 15 minutes over medium high heat without the lid. Seperate the soup and the ingredients by using a sieve. Put the soup into a shallow pan and proceed to B and C

B)
200gram Rice Cake
350gram combination of fishball, tofu, fish cake, or any yong ta fu ingredients
1 mushroom

C)
1 tbsp Hot pepper flakes
3 tbsp sugar
3 tbsp Hot Pepper Paste

D)
1 dried noodle

E) Hard boil egg

Steps:
- Prepare the hard boil egg in a seperate pot
- Put B and C into A and stir gently with a wooden spoon when it starts to boil. Keep stirring until the rice cake turns soft and the sauce thickens and looks shiny, which should take about 10 -15 minutes. If the rice cake is not soft enough, add more water and continue stirring until soften. When you use freshly made rice cake, it takes shorter time. If you use frozen rice cake, thaw it out and soak in cold water to soften it before cooking.
-Add in the egg, remove from the heat and serve hot.


Friday, July 29, 2016

How to make Frozen Chicken Recipe

Since the day that I bought my Pensonic Air Fryer, I have toyed with the idea/fantasy of making fried chicken from scratch! The motivation in making the fried chicken is that air fryer uses less oil compare to conventional method and that I could make "instant" chicken (when i freeze the leftover uncook chicken) in minutes! Further the price of frozen food is getting more expensive and we never know what they put into the frozen chicken. I also love this recipe as I could also include in my electric lunch box plans whereby i just air fry in the morning and I pack it straight to work.

Once I have tried successfully, there is no going back to store bought frozen fried chicken anymore! I have made this recipe 3 times within a few weeks, it is that addictive! The chicken came out moist in the inside and crispy on the outside. As I am heavy on the seasoning, the chicken is pack with great flavors.

For the Flour mixture I have adapted from Sonya recipes with variations while I come out with my own seasoning methods which works! I have initially tried the original recipe from Sonya however i may have miss something as the texture of the chicken was not what I was looking for.

I use the buttermilk and let the chicken rest for about half hour for the buttermilk to absorb the flour. This is a crucial steps.

Did I also confess that I love to collect herbs? I could locate most of the herbs under Sing Long Food Products Sdn Bhd which I have bought from Mercato (Pavillion) in Kuala Lumpur, Malaysia. This brand is also commonly found in other supermarkets. The prices are more affordable compared to the imported herbs. Aside to Sing Long, I was able to locate herbs in Bake with Yen with very reasonable prices.

I will scope out the necessary amount of flour mixture to another bowl during the dipping.  So that I could store the extra unused flour mixture for another fried chicken projects! Thus I could save time by just prepare chicken season and I could skip the extra steps of preparing the flour mixture.

1. This is how it looks like after seasoning the chicken for few hours in the fridge
 
2. Preparing my dredging stations! I have put the chicken on the wire rack to drain out any excess liquid before dredging starts. The top right corner is the buttermilk substitute made by milk and vinegar

3. I have dredge the chicken and put on the wire wrack on clockwise direction. Notice in the picture some of chicken is white powdery and some are orange color? I need the chicken to look like the orange color version which mans the chicken's flour is "soak" with the buttermilk. Roughly about half an hour or faster

4. I have line the pan with wax baking paper, and pour the leftover flour before putting the chicken on top. Note that I try to ensure that the chicken doesnt touch each other. This is so that it is easier for me to repack once the chicken are frozen solid.
 Recipes:
A) Seasoning the chicken
1 tsp paprika
1 tsp cumin
1 tsp salt
1 tsp onion powder
1 tsp garlic powder
1 tsp ginger powder
1 tbsp oyster sauce
1-2 tbsp soy sauce
1 tsp sugar
1-3 tsp Korean cili powder
some water to let the paste come together

B) Flour mixture - can store the leftovers
300g flour
2 tst mixed herbs
1 tsp cumin powder
1 tsp Paprika
1/2 tsp five spice powder
1 tsp salt
1 tsp black pepper powder
1 tsp white pepper powder
2 tsp onion powder
1 tsp garlic powder

C) Homemade buttermilk recipe- If you don't have the real thing
1 cup hot milk (full cream)
1-2 tbsp vinegar
(mix all together, sieve and you will have buttermilk)

Steps
1. Season the chicken for 2 hours or overnight. If the paste is too thick, then feel free to add water
2. Put together the flour mixture and buttermilk. For the buttermilk, I use the full cream milk powder and mix with hot water before pouring the vinegar. You may use fresh milk but you need to heat it as I notice the vinegar reaction slowed down when using the cold milk.
2. Remove excess seasoning by letting the chicken sit on a wire rack before dipping into the buttermilk, followed by flour mixture and let it rest for half hour on a wire rack.
3. Cook in the air fryer for 180 degree C for 20 min followed by 200degree C for 5 min OR you may store the excess chicken by putting the chicken on a tray line with wax paper. Once frozen, then you may keep in together in a bag.


For Pensonic air fryer, I notice that I need to pour some oil on the chicken to cook successfully. Please try and do let me know how yours turn out!

Mapo topu / Mr. Baek's Recipe (Korean style!)

Mapo Tofu  - Chef Baek
While searching for Home Food Rescue recipe, i stumble upon this youtube video by R Cook. After viewing it, I know that I have to try it and it taste great! 

One thing I like about the recipes by Chef Baek is that he will repeatedly use the same basic ingredients to create different variation of dishes! Thus my initial splurge in buying Korean ingredients doesn't go to waste for example Hot pepper paste (Gochujang), Hot Pepper flakes (Gochugaru), soy sauce (particularly Jin Ganjang) and soy bean paste.

I would recommend going to Phill Mart (Dae Won Food (M) Sdn Bhd)  at Ampang, Selangor to look for the Korean ingredients. If the ingredients you were looking for is not at Phil Mart, fret not as there are similar korean grocery shops near Phil Mart and you could also compare prices. At the shop, you could look for fresh ingredients, condiments, utensils and instant noodles. I notice that the shop sells refillable Gochujang and you could save a few ringgit. You could also locate Korean ingredients at selected supermarket like Mercato (Pavillion)  however choices will be limited and the price may be higher.

Now, back to the Mapo Tofu, i sprang into action since i have all the ingredients at hand!

Ingredients
A)
- Spring Onion: 1 root - Chop

B)
- Onions: 1 - Chop

C)
- Minced Pork: 250g

D)
- Chilli powder: 3 tablespoons
- Soy bean paste: 1 tablespoon
- Chopped garlic: 2 tablespoons
- Pepper Paste: 1/2 tablespoon
- soy sauce : 1/4 cup
- Water: 2 cups

E)
- tofu: 1 - cut into cube

F)
- Starch water

1. First put some oil in wok and stir fry A) till fried. Only switch on the fire after the spring onion is added.  
2. Add in B) and cook till its white
3. Add in C) till its cook
4. Add in D) - seasoning first, stir and followed by water, stir. 
5. Add E) when the mixture boil. followed by F) till its thicken. 


Monday, July 25, 2016

Episode S2E15 home food rescue / mr baek the homemade food master - steak recipe

Episode S2E15 home food rescue / home made food master - steak recipe

I love this show and I have tried a few of the show recipe with great results. Thus I tried to document recipes while watching the show.
Some parts may be estimate and I will create a separate post with pictures should I try them out.

According to chef baek, he uses beef's shoulder to prepare the steak. There is 3  type of thickness shown. The common one are thin and thick. Thin one is available in supermarket while thick (he show 4 time more thick than the thin steak) steak is sold by the butcher. From the show it look like thin one are easier to prepare. The third type shown in the show are bulgolgi meat - to me it look like those fatty meat seen in steam boat.

3 things that r important when cooking steak is
1) Seasoning
2)Sauce
3)Side dish

Seasoning
Salt front and back
Black pepper front and back
Tap the seasoning in a bit

For thick stick need to season for two,  hours - for thin will take lesser time but he didn't specify

To avoid shrinking, cut the meat a bit here n there normally around the pork got slit n in middle

Use normal flour. Coat the meat both side thoroughly
( The above seasoning technic is use throughout the show)

Steak recipe 1 - garlic steak recipe
6-7 garlic, skin removed but no need cut small

Put oil in non steak, 1 layer. Put more oil if it is for thick steak.
Cook slowly, medium fire.put 6-7 garlic surrounding the stick. Don't cook until golden brown.
Flip the meat and it is still white. Turn the non stick sideway to cook side of meat if thick.
When ready the meat is still whitish in colour.
Drain the oil and take out garlic. Put the meat back into the pan, cut a small piece of butter put in n cook. The meat is slightly brown at this stage and serve

Recipe 2- garlic Steak with tomato sauce
Cook steak again with garlic at side 7 pcs and 1 slice meat, drain oil n take out garlic,  then put butter n cook meat. Take out meat and set aside

Make sauce
With the leftover butter, continue with
1 tb sugar. Use normal spoon
2 tb tomato sauce
1 tb soy sauce
1tb vinegar. Stir all and cook till no sour taste then add aboutHalf a cup water  bit by bit. Then put in steak n garlic. It will absorb the water.
Put some black pepper season to taste and serve.

Recipe 3 - Steak with 2nd sauce
Cook the steak, drain oil, put in butter. Cook steak.take out steak.
Cut onion into slice n cook till soften, put in two spoon sugar, 4 spoon tomato sauce, 2 spoon soy sauce,2 spoon vinegar. Pour in about half cup water bit by bit n stir.consistency a bit thick.pour on top of steak

But if pour too much water n it become watery then put the steak in n cook together.

Cook sunny side egg seperately n serve together


Recipe 4 - Steak with 3rd sauce
Prepare the side-
Salad recipe.
Some Cut carrot slice
SomeCut cucumber slice
Some Salad
Cut half onion semi ring

Salad sauce recipe.
All 1:1 ratio. Sugar 0.5
1/3 soy sauce thick Korean
1/3 cup water
1/3cup white sesame seed
1/6 cup sugar
1/3 mayonnaise
(This sauce can also use with soft tofu)

Prepare steak
1-2 steak
Half onion cut semicircle
Some White mushroom cut slice (same as the type make mushroom soup)

When almost cook the steak put in onion n mushroom.
Take out steak.
Drain out put aside onion mix.

Make sauce
Put some oil and some flour together 1:1 ratio - sauce demi glace
Cook and stir till yellow
Put in milk about 1 cup bit by bit and stir
A bit salt
Put back onion mix
Put some water till a bit watery
Put in steak.
And season with black pepper.let it cook a while n serve.


Seperately put in the salad and sauce together.

Take out steak and serve together with sauce

Recipe 5 - Steak using bulgolgi meat. It look like steam boat meat with fat
Season steak with salt n pepper. After a while dip into flour

Side recipe
Mash potato recipe
4 Steam potato - mash
1 cup milk (For four potato medium use 1 cup milk n stir. Potato will absorb the milk)
Salt a bit
Sugar a bit
Krim putar 1/3 cup. Could b wip cream
Mix everything together

Cut cucumber
Mushroom
Red capsicum

Put oil n cook steak.once cook take out
Put in vege mix
Stir fry n take out

Put butter 3 small piece n flour . Cook till coklat. 1 spoon sugar ,4 spoon tomato sauce, 2 spoon soy sauce, 2 cuka. 1 cup water. Stir bit by bit. Or up to 2 cup water
. Put in vege mix
Some black pepper
Put in steak n cook.
Serve with mash potato n steak


LinkWithin

Related Posts with Thumbnails