Adsense

Friday, October 29, 2010

Meldrum walk stall part 2 - Chinese section

Click here for part 1
My Favourite food in Johor Bahru/Johor (Malaysia) Part 5 - Meldrum Walk food stalls


This is part 2 about Meldrum walk stalls. I wanted to post more about the stalls that i frequent and love to go. Photo quality is low because i snap quick pictures with my phone. All the below stalls are located on the same stretch of street.

Famous Popiah stall

Chicken rice stall
I like to order white chicken rice from them. I like their chicken rice but overall the chicken rice is a tad too oily.
My friend ordered roasted chicken rice

Ikan bakar stall
Sotong bakar. I love their sotong. Its cook just nice and the sambal goes well with the sotong.
Udang bakar


 Char Kueh Tiao stall


The char kueh tiao that they cook. I love to eat this char kueh tiao


Fried Oyster stall
 This stall is also a hot seller. The oyster they gave are big and fresh. The egg cook just nice.

Thursday, October 28, 2010

Easy Cheesecake Recipe: How To Make Cheesecake

Sambal Sotong (Squid) and Sambal Udang (Prawn) Peranakan recipe

 Sambal Prawn and Sambal Sotong

I took the recipe from Marshal Cavendish - Classic Peranakan Cooking sold in Popular book store.

This has been another Peranakan dish that I have wanted to try! I found this recipe in the book and the instruction was clear and decided to test the recipes~

I took notice of this sambal dish when I ate it while studying in Malacca. I feel in love with it and ate it in Malacca whenever I could. There is a few variation and I love to order Sambal Pork rice from a restaurant call Pin Kee near my campus. Now that I am back in JB, I could not find the same taste in JB and I often crave for it especially the first few months that I came back permanently. I have tried cooking this dish with my mum last time and I have even blog about it. Only just recently I realize that this dish is actually a peranakan food and that I notice a lot of dish in Malacca are influence by Peranakan style of cooking. I guess that explain why it is not common in JB. 

I use food processor to process the rempah
The key to making a good Sambal Sotong/Prawn is from the rempah. I notice that there is different kind of combo of dried chillies and shallots offered across the internet. Some website increases the dried chillies and reduce the number of shallots. I like the taste from this recipe and it is only mildly spicy because I have remove the chilli seeds. However it is a bit salty since I added half a teaspoon of salt when there is already tamarind (assam jawa) juice added (I forget to divide by half the quantity of salt since i have divided by half the quantity of rempah and the seafood). So next time I will watch out how much salt i put in. Other than that this Sambal Prawn and Sambal Sotong has receive great praises from my dad! He love it so much and he feels that his appetite improve.

Another important note is that the rempah burn easily when you cook it. I tend to use small fire and then big fire alternately while continuously stir it. According to books they say that the sambal is ready when the oil separates from the sambal. However a baba friend of mine use an ingenious method. He say that he knows when the sambal is ready when he started sneezing! It is a strange advice but it strangely work for me too!

This recipe is originally meant for Sambal Prawn. But I decided to mix in the Sotong to lend the dish more variety. In the rempah section, I follow exactly the quantity stated. However I ended up only using half of the rempah as I only use about 300gram of prawn and squid combine. I also only use about half of the tamarind juice which is about 100ml with 1 tbsp spoon of tamarind pulp.

Another note also is that I only dump the tamarind juice in at the last minute as I wanted to prevent chemical reaction with my kuali.

Sambal Udang (Prawn) Recipe (The quantity originally taken from the book. You can divide the ingredient if you use less prawn like me)


Fresh prawn 500g
cooking oil 4-6 Tbsp
Tamarind pulp 2 tbsp mixed with 250ml (8floz - 1 cup water and strain)
sugar 1/2 tbsp to taste
salt 1/2 tsp to taste

Rempah
dried chillies        8 presoak
red chillies        3
candlenuts        3
dried prawns shrimp paste belacan    2.5 x 1cm (1 x 1/2-in) piece
shallots 15 small peeled

(steps have been modified)
-Peel and devein prawns. Rinse and set aside. (I also use squid. So i clean and chop them into slices. Both prawn and squid total up to about 300gram).
-Pound rempah ingredients until fine using a mortar and pestle (or you can use food processor like I did)
-Heat oil in a wok until smoking hot. Add pounded rempah ingredients until fragrant but not burnt and oil seperates from paste.
-Add prawns and squid. I do not want to overcook the prawn and squid. So i quickly add the sugar, salt and tamarind juice. Once the prawn changes to pink colour. I switch off the fire and serve immidiately.

Wednesday, October 27, 2010

Dry Mee with poach egg recipe experiment!

I wanted to make dry mee version from those mee stalls. I couldn't really find a recipe so I decided to experiment on my own! I came back from work and I was famish. With a picture of how my mee should be like. I proceed to make poach egg, chop some spring onion, blanch taugeh and red pepper. I also add in a type of fragrant leaf from my mum's garden for added flavour.

As for the dry mee sauce, I played around with sesame oil, light and dark soya sauce, pepper, a bit of salt and sugar. And voila~! My dry mee with poach egg is ready! As I was really hungry I practically slurp the whole mee down! Ooishi!

This experiment is great! Cause it is easy to make and I do not have to rely on instant noodle seasoning! Plus some dry mee sold in stalls has added tonnes of oil in them. This has definitely become a healthier choice! Go try experiment on your own!

Related links:
How to poach egg

How to make yogurt recipe - the easy way!

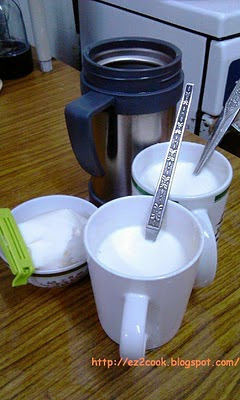
Making yogurt is so easy and simple that you should try making them yourself. There is a sense of satisfaction and you can adjust the thickness of the yogurt base on individual preference. Plus by making them yourself, you know what you have put in and may skip store bought yogurt with preservative added. You only need 3 ingredients in making yogurt: hot water, milk powder and yogurt starter. As for utensil its best to use thermos to maintain a consistent temperature to enable the yogurt bacteria to germinate.

Its been a long time that i last made my yogurt. Its actually super easy to make yogurt. I am not sure why they make it so complicated at the website when i google them. Maybe because their weather is different which is why they are complicating the process by double boiling and cooking. My mum advice that I must make the yogurt at night to maximize the chance of the yogurt to succeed.

Ingredient
#Yogurt starter
#Milk powder - about 4 tablespoon each cup
#Hot water
#normal size drinking cup (1-2 cups depending on the quantity you wanted to make)
#thermos to maintain a consistent temperature


Steps
-Pour hot water in cup
-Put about 4 big tablespoon of milk powder into each cup. I like putting a lot of milk powder as I like my yogurt to have a thick consistency. You can adjust the number of scoop you put in.
-Once satisfied with the thickness, wait till the milk become warm. You can test by putting your finger in. If too hot then the yogurt starter bacteria will die.
- Put in the yogurt starter when the temperature of the milk is below 120°F(49°C), but don't let the milk cool below 90°F (32°C). 110°F (43°C) is the optimal temperature. 
-Once warm put in about 1 tablespoon of yogurt starter into the milk.
-Pour all the mixture into thermos. Cap it and leave overnight for about 8 hours at room temperature. If you leave the yogurt outside too long, the yogurt may turn sour. Store the yogurt into the fridge once the yogurt is ready.
 1 tablespoon. I add in about 4 scoop.

The mixture after stirring the milk. You can sieve the milk before pouring into the thermos.

There might be some liquid pooling in the yogurt. Just pour away the water and consume the yogurt like normal. If you have fruits like strawberry or apple. Cut them into small slices and mix into the yogurt. Yogurt is a "cooling" type of food (according to my mum). If you tend to eat heaty food like curry, you can eat yogurt to balance out your diet. However please eat the yogurt in moderation.

Yogurt are versatile. Other than adding fruits into yogurt, you can make yogurt ice cream, yogurt shake and yogurt drink. I will expand this page if i try anything new with yogurt.
 
 Breakfast Parfait recipe taken from DonnaHay website. At the bottom i grind Post banana cornflakes. Add in a teaspoon of honey before pouring in the yogurt mixture. I mix in some Raspberry, icing sugar into the yogurt. I top it with Raspberry and a teaspoon of honey.

 Mixing yogurt with my banana cornflakes! Can drizzle 1 teaspoon honey for added taste.

Dried Mee with mince meat sauce recipe

I adapt the recipe from babeinthecitykl. Some of the steps below are copied from her post. The dried mee came out beautifully delicious! I also add in some other ingredients like Poach eggs, mushroom, spring onion and add fish sauce into the mince meat.

I have wanted to make those dry mee version that the stall sell. I have wondered what sauce they put into the dry mee. Every stall seems to have their own version. At first I tried concocting my own version when I couldn't find one online. I tried a few variations. After googling how to prepare the mince meat on dry mee, I came across this blog that gave instruction on how to prepare mince meat on dry mee! Her steps are very easy to understand and I had all the ingredient at hand!

I followed her instruction and added new ingredients of my own. After checking my freezer I realize that I have run out of mince meat. So I defrost some chicken breast meat and mince them in food processor once remove the bone. The portion enough to be eaten by 3 ppl.

I marinate them with light soya sauce, fish sauce, sesame oil, pepper and cornstarch (watch out as light soya sauce and fish sauce are salty and fish sauce is optional). Marinate for 15 minutes. As for other ingredients I chop 1 onion, 3 cloves garlic, wash and soak dry mushroom in water till soft, wash some vege and poach an egg.
Ingredients
Cooking
-Sauté the onion in oil till translucent.
-Dump the garlic in and fry till fragrant. (Both ingredients above may burn easily so watch out)
-Add mince meat and fry till brown before stirring and flipping to brown the other side. At this point I will shred the meat into small pieces.
-Pour in some oyster sauce and some thick soya sauce (for color). Oyster sauce is already salty so it is not necessary to add salt.
-Stir and pour in some water (depending on how much sauce u like). Remember that I soak and wash the mushroom at the beginning? The water will turn a bit brown from the mushroom and I just sieve and pour in the water to the mince meat.
-Cover and simmer till cook.

Poach the egg, blanch the mee and vege. Sprinkle some spring onion (optional). Put all of them together. When eating just mix all together!

How to poach egg

Tuesday, October 26, 2010

How to cook poach egg recipe - the easy way!

Its really easy to poach egg. If you have google on poach egg, you will come across various detailed instruction. I followed steps by steps of their tedious and long explanation and came to a conclusion. Use a medium pot (my pot 10cm tall), hot water, egg and vinegar. Its actually very simple. Poach egg can be use from Eggs Benedict with Hollandaise sauce to matching Chinese dried mee. I have not made eggs benedict but i have tried matching it with burger meat.

 Poach egg matching with burger. A nice and light supper! Look how runny the egg yolk is!

Poach egg is not only easy to make, the egg white tend to be cook while the egg yolk remain runny! Imagine the egg yolk burst out and out comes runny looking egg yolk! Ooishi! My favorite way of eating half cook egg is to eat the egg white first then slowly move in and pop the egg yolk into my mouth. I love the sensation where the whole yolk burst in my mouth!

The main ingredient in making Poach Egg is Vinegar. Because it keeps the egg from separating when you pour the egg into the water.


 Main ingredient: Vinegar     

 10cm pot. Read on to understand why you need a medium tall pot.

 1. Fill water into the pot. Slightly higher than the egg level.

 
 2. When water boil (when air bubble start to appear at the bottom of the pot). Break egg into a small bowl. Slowly tip the egg into the boiling water.

 3. Do not stir the water. Let the egg cook for a min or two. Also do not walk away from the egg. You can add another 2-3 egg into the pot depending on your pot size.

 4. The reason you need a medium size pot! When the water boil with the egg inside, bubble will start to form. Switch off gas. Sometimes the egg will stick to the bottom. Scoop it up carefully.

Beautiful poach egg. Cook egg white with runny egg yolk.

Chocolate Ice cream recipe (cook custard base)

 Chocolate ice cream. I name it Strawberry Chocolate Sunrise

Ingredients
15g cocoa powder - I use HERSHEY'S Cocoa
110 gram of icing sugar
1 egg
2 egg yolk
1 pinch of salt

300ml milk (I use fresh milk. Most recipe recommend Full Cream milk/whole milk)

200ml Whipping cream

1 baking sheet to cover chocolate custard surface

Preparing the Chocolate Custard
Put egg in a bowl and sieve in the icing sugar. Beat the egg till its almost white. Carefully pour in the cocoa powder. Mix it carefully with a spoon (watch out the cocoa powder is light and will spill). Beat the whole mixture till well mix. I usually beat the mixture till its a shade lighter due to the egg. Add in salt.

Heat up 300 milk in small fire. Dont bowl or simmer. Bubble start forming when its done

Pour the milk slowly into the chocolate mixture. Can choose to pour half or almost all in. While stirring the mixture, move the pot back to the stove.

Pour the mixture back into the pot.

Use low heat and continuously stir the mixture. When mixture is ready pour into a sieve to remove any egg curdle.

Tip: How to control the fire when cooking the egg custard? I cook it for about 4-6 minutes. Some recipe recommend 3 mins. Use a wooden spatula. Stir continuously while cooking. I control the fire by switching it on in low heat for a minute. Switch if off for 1 min. Switch it on for about 1 minute and switch it off again. I stir particularly vigorously at the end.

Tip: How do I know the Chocolate custard is ready? 1) When the custard coat the back of the wooden spoon. 2) Once its getting slightly harder to stir which means the custard is thickening. 3) When it stick to the bottom of your pot. When reach point 2 and 3 stop and switch off the fire.

To prevent skim from forming, cover the custard surface (that means the paper touches the surface of the custard) for about 2 hours. When its completely cool down, remove the baking sheet and pop it into the fridge/chiller overnight.

The next day, whip the cream till its peak. Pour in the chocolate custard into the whipping cream and stir gently until mix. Pop into the freezer this time and chill for 2 hours.
 
After storing for 2 hours in the freezer. Break the icicles by stirring with a spoon.


Break up the icicles and pour into the ice cream machine!
 
 Beautiful looking Chocolate ice cream. I like to churn for about half to 40mins.

Paul the Octopus. This is dedicated for you!

I dedicate this ice cream to Paul the Octopus that has sadly pass away today. I name it Strawberry Chocolate Sunrise. May you RIP happily in Octopus Heaven.

Decoration: Strawberry with icing sugar. Chocolate ice cream drizzle with Chocolate syrup, almond nibs and whip cream.

How to make chocolate ice cream recipe?

Monday, October 25, 2010

Kitchen spree in October

 I went Singapore recently and bought a lot of kitchen utensils. I mainly wanted to get a Braun hand mixer and weighing machine plus a visit to Phoon Huat. I end up finding tonnes of treasure trove and switch my purchase of hand mixer to Philip HR1561 that cost $50 at Courts Causeway Point in Woodlands. Took picture of all my new toys below.

 
 Philip HR1561
 Philip HR1561. Cost $50 and has 350 walt motor. In the box it include beater and dough hooks, 2 year warranty, instruction manual and storage box.

I needed a hand mixer to replace my Elba hand mixer. I realize that my stand mixer is too big to handle certain recipe with small quantity. Which is why I needed a hand mixer!

 Electronic weighing machine from Japan bought for $59.90. This baby is so cute and light! First red button: on/off button. The second pink button: reset the weight if you put a bowl on it which means you do not have to include the bowl measurement when you measure your ingredient.


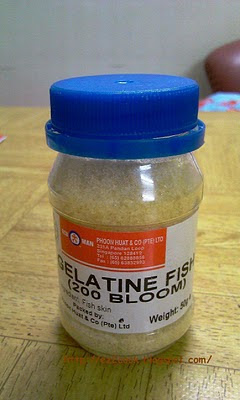
My journey to Phoon Huat prove to be a fruitful journey! I found loads of item that I couldn't find in JB. I wish I can buy ALL of them but I selected a few that I plan to use sometime soon. I bought Instant Read Thermometer, Oven thermometer, Piping bag, Gelatine made from fish and Vanilla pods!

Cooper Oven thermometer. Useful if you are unsure of your oven's temperature. My oven does not state the temperature clearly so I was using some guesswork to get the temperature right. Cost $10.09 at Phoon Huat.

Cooper Instant Read Thermometer. Useful when your recipe calls for certain temperature. Eg the ideal temperature to melt chocolate and white chocolate. Cost $14.70. I am glad i hold of purchasing this thermometer while i was shopping around Metro at Woodlands. Cause the price there was $39.90 for an Instant Read Thermometer (i forget the brand).
 Fish Gelatine! Finally I found a Gelatine that both my Indian friend and Chinese friend could consume when i make cake. Was having a headache to look for a suitable replacement when the ingredient calls for Gelatine. Cost $1.50

 Vanilla pods! Finally i found Vanilla pods in Singapore. I was searching high and low for this elusive ingredient in JB. A lot of western recipe calls for Vanilla pods and its suppose to be more flavorful compare with Vanilla flavoring. I am really happy when i found it! I can also make Vanilla sugar at home from this Vanilla pods.
Cost $10 at Phoon Huat.

Piping bag. I belief its easier to use than the plastic bottle type. Price $3.77

 My Kitchen Shopping spree in Singapore

Friday, October 22, 2010

Easy way of making mash potato recipe

Ingredient
Potato - boil the potato till its soften
Milk powder
Salted butter


1. Peel potato skin. Careful as the potato may still be hot.
2. Mash the potato. I use a fork.
3. Milk powder to taste
4. Put salted to taste.Done!

Wednesday, October 20, 2010

(PART 2) Marathon cooking during my two day off! (Day 2 Oct 19)

Day 2 and I am off to a shooting start!
 
Garlic bread for breakfast. Decide to make garlic paste and spread over bread followed by toasting! Delicious yummy breakfast~!

 Banana Muffin. I love the banana muffin made last week! Every one who ate it love it too. Since it was such a hit, I decide to make it again this week! This round i forget to melt the butter and surprisingly the muffin turn out better as there is less liquid. Dad say my muffin this round is better than last round! 
I went a little wild and experimented on the topping. 
-Crush almond, almond nibs, and chocolate/white chip (best combo)
-Nestum, Hershey chocolate kisses and honey (too sweet due to the honey - wont try again)
-Oats, Hershey chocolate kisses and honey (better than nestum but still too sweet due to the honey - wont try again)
-Just drizzle honey on top. Disaster as the muffin could not rise (definitely wont try again!)
-Heshey kisses and almond nibs. (Nice but Hershey a bit too sweet. Wont be buying anymore Hershey kisses!)

 
 Banana muffin! Hershey kisses and almond nibs. Aren't they beautiful?

 The hit. Crush Almonds, almond nibs and chocolate/white chips

Chocolate Chip Cookies. My chocolate chip cookies fail miserably as its too sweet. I bought the wrong type of Chocolate chip but decide to still make them. Next time must buy semi sweet chocolate chip!


For dinner i made Sambal Sotong, Vege and Rice. Funny part of the process is that I manage to cook all nicely except the rice! While washing vege I smell something was burning. Feeling strange that my kuali fire is off, i turn and realize that the smell was coming from my rice! (We use a manual method of cooking rice and we dont use rice cooker) When i open the pot, too late the whole rice has burn and the bottom has turn charcoal black. Throw and make second round of rice while eyeing the fire this time.
Dinner time! Making the rempah for the Sambal Sotong!

Delicious Peranakan Sambal Prawn and Sotong combination! Second time making Sambal sotong/prawn. Finally succeeded! A bit salty to my taste but my dad totally love it! He said he crave for more!
 I feel hungry just looking at the picture!

How to make sambal prawn and sambal sotong (Squid) click here!

 Vege to match my dinner

I begin first half of day by making garlic bread and banana muffin. I clean the dishes, rested and continued making chocolate chip cookies,  Sambal Sotong and Sambal Prawn, vege and rice. Later half of the day I was in a hurry to cook everything. While baking the cookies i multitask between making sambal, cleaning prawn and sotong, cleaning vege, prepare ingredient and rice so that I can serve dinner on time. Needless to say the state of the kitchen was like a tornado has just pass thru it. It was a huge mess! You can see all my kitchen utensils on display! After eating, I started washing everything vigorously. So tired at the end of the day~

Looking at all the pictures. I was rather amaze that I made so many type of cooking. 9 types of food in 2 days. I have covered breakfast, dessert, making yogurt from scratch and main course. From western dessert, chinese food and peranakan food. Hem...so what should i make next? Hem...I wanted to try making fish and chips! Kacang cream cake is definitely in my agenda. Or how about researching and making Chocolate Molten Lava cake or brownies to match with my ice cream?

Marathon cooking during my 2 day off! (Day 1 Oct 18)

LinkWithin

Related Posts with Thumbnails